Documentation:MTRL Cluster Abaqus
Protocol of Use
Protocol of Sharing Abaqus Computation Licenses (MTRL Cluster)
Version: Feb 10th, 2020
Some information
· We have in total 70 licenses. However, these licenses are shared with another department who contributes 50% of the cost.
· The number of licenses taken by each case depends on the number of processes used for the calculation – see the table below.
| Processors | 1 | 2 | 3 | 4 | 5 | 6 | 7 | 8 | 9 | 10 | 11 | 12 |
| Licenses | 5 | 6 | 7 | 8 | 9 | 10 | 11 | 12 | 12 | 13 | 13 | 14 |
Protocol (ONLY applies to the research licenses):
Since the number of Abaqus licenses is limited but we have many users, we would like to implement this protocol to share the Abaqus licenses with regulations so that our work with Abaqus (particularly during the daytime) will be less likely to be halted due to run-out of licenses. Two time windows have been set up – Time Window A for daytime hours and Time Window B for nighttime hours and weekends:
- Time Window A (7:00am to 6:00pm in weekdays):
- At any time, each person can NOT take more than 20 licenses
- When the number of checked out licenses reaches 50, each person can take no more than 10 licenses. This means: if you are taking more than 10 licenses, at any time when the number of licenses reaches 50, the administrator may delete your running job without notification to reduce the number of used licenses.
- Note:
- The administrator decides which jobs to be deleted; and
- You may lose your data of the deleted job
- Therefore, in order to reduce the potential impact for you when the license gets busy, please: 1) check the status of Abaqus licenses at a reasonable frequency; and 2) if you are running multiple cases, please make each case taking no more than 10 licenses
- Time Window B (6:00pm to 7:00am in weekdays and any time in weekends):
- Each person can NOT take more than 28 licenses
- If you are running a case that takes more than 20 licenses during the night, it needs to be finished before 7:00am in the next day
- Notes:
- If your case is urgent and this protocol slows down your progress, please promptly talk to your supervisor and let us know
- This protocol is based on the current situation (number of users/jobs and tokens available), it may be adjusted in the future depending on the tokens available.
Protocol of Sharing Abaqus CAE Licenses (MTRL Cluster)
7 CAE licenses are available.
- Each user is limited to use 1 at once time.
- No matter the job is run on the server or your desktop, the CAE should only be used for pre- and post-processing. Please use command line to submit your job for computation.
- The CAE should be closed immediately once the work (pre- and post-processing) is done to release the license.
- If the CAE license is occupied by 4+ hours, it will be deemed as being used for computation.
Installation of Abaqus
- Before installation, please email the administrator (jun.ou[at]ubc.ca and daan.maijer[at]ubc.ca) the following information for the purpose of administration.
- You name and research group
- Your computer's name
- Please note you need UBC VPN for the following operations (including downloading the software) as well as running the software.
- Check UBC VPN support webpage if you don't know how to install and run UBC VPN: https://it.ubc.ca/services/email-voice-internet/myvpn/setup-documents
Software downloading
The software installation files are stored on the MTRL cluster for downloading.
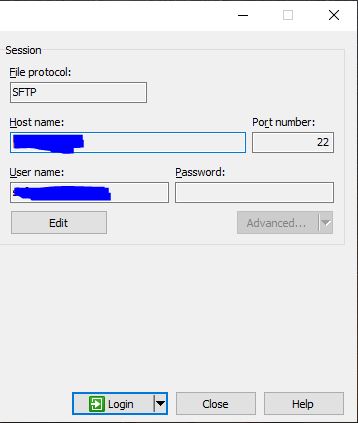
- Use WinSCP to login and manage the files. You can download here https://winscp.net/eng/download.php
- Login using the information provided by the administrator (Note: Host name is the cluster's IP address)
- Download the files in the folder "abaqus2018" in the the user's home directory

Install procedure
- You should already have the installation files.
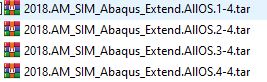

- Unzip the files. Make sure unzip ALL the zipped files. Unzip to the default folder- do not change anything. Just unzip.
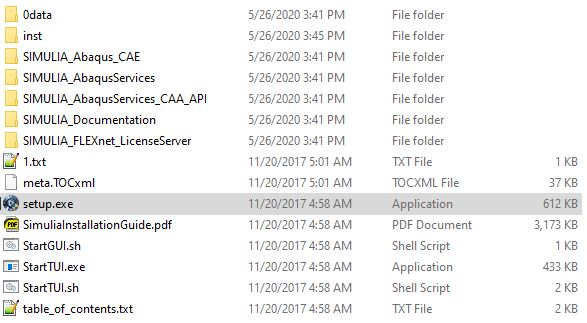

- Run the setup.exe as administrator
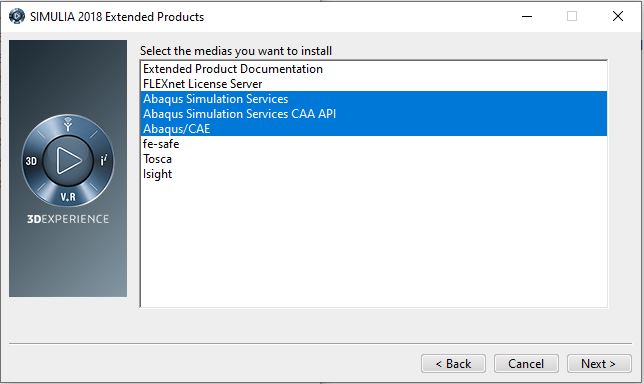
- Select the components you want to install. You probably only need the three that starts with "Abaqus"
- For whatever else, click Next, Accept, Allow access...
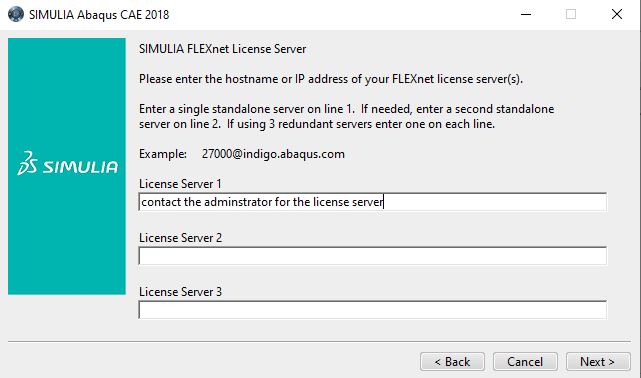
- However, when asking for License server, select
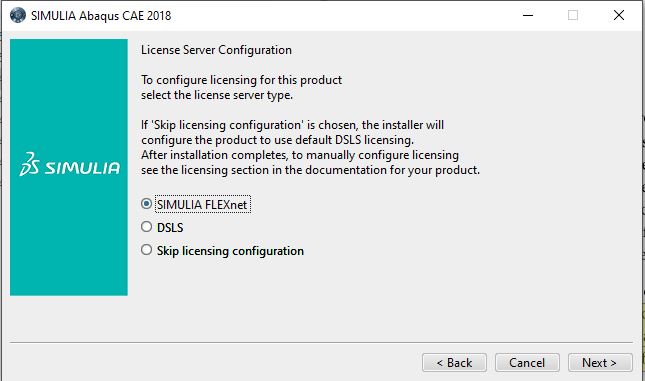
- input the license server (contact the administrator for the license server, let him/her know which license you are requesting? the research or the teaching license?)


After going through all steps, you should be able to launch the software.
Change of license server after installation
If you need to change your license server after installation, for example, switching between teaching and research license, go to the file: C:\Program Files\Dassault Systemes\SimulationServices\V6R2018x\win_b64\SMA\site\custom_v6.env, and update the file.
- For version 2020, the file is in windows\simulia\estproducts\202\win_b64\sma\site

Running Jobs
Job Submission
All jobs need to be submitted through the scheduler on the cluster. Please note that you should NOT submit jobs on the master node as you would through Abaqus command on your local machine. For example: do not submit your job by using the command: "abaqus job=jobname user=subroutine.f cpus=N". Instead, a .pbs script should be written which specifies the files for the analysis, number of cpus and which node on the cluster to run on. The job can be submitted using the "qsub" command. An example of submitting a job via the scheduler is shown below:
- SSH into the MTRL cluster using PuTTY or similar
- Ensure all files and the .pbs script is within the same working directory
- Navigate into the desired working directory on PuTTY
- Use the command: "qsub filename.pbs" to submit your job
- The job will then be assigned a number
Job Monitoring
Within the master node, you can use command "qstat" to see the if your job is running, queued or cancelled.
Using the template .pbs script at the end of this section, a temporary directory on the node specified will be created so the job can be monitored. To access this temporary directory, follow these steps:
- Log into the specified node that your job is running on using the command: "nodeXX"
- cd /tmp
- List the directories in the tmp directory using the command: "ls"
- Find your current job directory with the assigned number followed by master3 and your username - Ex) "12345.master3.username"
- Enter directory by using the command "cd 12345.master3.username"
- You can now monitor the job using the .sta file by opening it using commands such as "vi", "cat", etc.
When the job has completed successfully or terminated on its own, a new directory called "output" within your working directory on the master node will be created with all of the output files. The files in the temporary directory on the node that ran your job will then be deleted.
Cancelling Jobs
To cancel a job, it is best practice to go into the directory in the specific node your job is running on and terminate it through the Abaqus command as follows: "abaqus terminate job=jobname".
In order to cancel a job on the master node you can use the command: "qdel jobnumber" on the master node where job number is the particular number assigned when you submitted the job. If a job is ended abruptly using "qdel" then you need to go into the tmp directory where the files are stored and delete the folder. This can be done using the following steps:
- Go into the tmp working directory using the steps outlined in "Job Monitoring"
- View or copy any files you need.
- Delete the folder while in the tmp directory using the command "rm -r directoryname" where the directory name will look like "12345.master3.username"
Example .pbs Script
Copy and paste the text below the bullet points into a text editor such as "Notepad" and save file with a .pbs extension. The following items can be changed to suit the specific job:
- "nodes=node32" can be changed to specify any available node from 34 and below
- "ppn=12" can be changed to the desired number of cpus to be used for the job. NOTE: the greater number of cpus used increases the amount Abaqus licenses used.
- In order to change the version of abaqus used for the job modify:
- "abaqus/abaqus_2017" in the module load command to "abaqus/abaqus_2020" or available desired version
- "ABAQUS_CMD=abaqus" to "ABAQUS_CMD=abq2020" or any version to match the one specified above
- Specify your file names in your working directory by modifying the following lines in the script to match your job:
- ABAQUS_INPUT_PREFIX=inputfile_name
- ABAQUS_USER_ROUTINE=subroutine_name
- ABAQUS_JOB_PREFIX=jobname
Text to copy into editor and save as .pbs file:
#!/usr/bin/bash
#PBS -l nodes=node32:ppn=12
#PBS -j oe
#PBS -k oe
#PBS -e $PBS_O_WORKDIR
scratch=/tmp
cd $PBS_O_WORKDIR
USERID=`whoami`
PROC_TYPE=`uname -p`
echo "Current working directory is `pwd`"
echo "Running on `hostname`"
echo "Starting run at: `date`"
echo "Processor type: `uname -p`"
. /usr/local/Modules/3.2.6/init/bash
#if [ $PROC_TYPE == "x86_64" ] ; then
module load null modules tools/torque-maui abaqus/abaqus_2017 compilers/64/intel18.0 mpcci/mpcci-4.4.1 compilers/python2.7
echo "64bit selected"
#else
# module load null modules tools/torque-maui abaqus/abaqus_6.7-5.32
# echo "32bit selected"
#fi
if [ ! -d $scratch ] ; then
echo "No local scratch filesystem"
exit 1
fi
# Create the scratch directory and make current.
mkdir "$scratch"/"$PBS_JOBID"."$USERID"
chmod go-rwx "$scratch"/"$PBS_JOBID"."$USERID"
cd "$scratch"/"$PBS_JOBID"."$USERID"
ABAQUS_EXTRA_OPT="interactive"
ABAQUS_INPUT_PREFIX=inputfile_name
ABAQUS_USER_ROUTINE=subroutine_name
ABAQUS_JOB_PREFIX=jobname
ABAQUS_CMD=abaqus
# Copy your ABAQUS input file to the scratch directory.
cp $PBS_O_WORKDIR/$ABAQUS_INPUT_PREFIX* .
cp $PBS_O_WORKDIR/*.inp .
cp $PBS_O_WORKDIR/*.for .
if [ -f $PBS_O_WORKDIR/abaqus_v6.env ] ; then
cp $PBS_O_WORKDIR/abaqus_v6.env .
fi
# Run ABAQUS.
cp $PBS_O_WORKDIR/$ABAQUS_USER_ROUTINE.* .
# /opt/abaqus/Commands/abaqus inp=$ABAQUS_INPUT_PREFIX j=$ABAQUS_JOB_PREFIX user=$ABAQUS_USER_ROUTINE interactive
$ABAQUS_CMD inp=$ABAQUS_INPUT_PREFIX j=$ABAQUS_JOB_PREFIX user=$ABAQUS_USER_ROUTINE $ABAQUS_EXTRA_OPT
# Copy any output files, such as restart files, back to a
# directory. Check 1st, copy and remove the scratch directory.
if [ ! -d $PBS_O_WORKDIR/output ] ; then
echo "Output directory not found"
echo "Creating $PBS_O_WORKDIR/output"
mkdir $PBS_O_WORKDIR/output
fi
cp -R * $PBS_O_WORKDIR/output && ( echo "Removing scratch directory $scratch/$PBS_JOBID.$USERID" ; /bin/rm -R "$scratch"/"$PBS_JOBID"."$USERID" ) || ( echo Unable to copy to data directory. Check `hostname` for the run )