Documentation:Drupal Local Environment Setup
Introduction
This documentation is part of the CEDaR CMS project, where CEDaR builds a content management system for itself and for the community while still maintaining OCAP and FAIR compliant. This project is consists of 2 components for build: a Drupal interface for content upload and management, and an Airtable interface automated within Drupal. This documentation will solely focus on the explaining the steps to getting current Drupal site set up on one's local environment. This documentation will not cover the entirety of the project build on the Drupal side, but this set up is part of the workflow for doing any moderations on the Drupal site. Therefore, please make sure this step is done before attempting to do any Drupal development moderations.
Getting Started
Before setting up Drupal on the local environment, please install these applications if they're not installed on the device already:
- MAMP
- Git Bash
- GitHub Account with a token or SSH key generated
- Terminal (for macOS) or Command Prompt (for Windows) - Do not need to install. They come built-in to the device.
- KeePass
There are also additional files to be downloaded onto the local device. Please request these files from the Lab Supervisor. The files to request are the most recent database file (it should be of an .sql file format), the whole server folder that is compressed into a zip file and a KeePass file that contains the password to access the database. These files cannot live in this project's Github repository because they contain sensitive content such as passwords, therefore, they must be requested individually and cannot ever be pushed into the repository.
MAMP
MAMP is a software package that can be installed on macOS and Windows operating systems to run a live web server, and most commonly used for web development and local testing purposes. The Apache component that is included in the package is used to configure and run the web server. Once installed, Apache enables the device to host one or more websites by configuring and running a local Apache web server that allows developers to view their webpages in a browser without publishing to an external server.
MAMP also includes MySQL and PHP, which are two common technologies used for creating dynamic websites. This part of the project will also make use of MySQL and PHP.
MAMP, although designed for macOS systems, also has Windows compatible and downloadable installations available.
Git Bash
Git Bash is an application for local device environments which provides an emulation layer for a Git command line experience. Git Bash is a package that installs Bash, some common bash utilities and Git on a given operating system. One can think of it as a remote controller to the TV where the GitHub repository is the TV. It allows developers to make modifications to a given repository in their local environments.
Git Bash is slightly different than Bash. To understand what Git Bash is, one can think of it as Git and Bash working together to make sure your local device can perform specific operations to a given repository locally, and have that be reflected in the origin as well (origin is the online version of the repository on GitHub).
If one does not know what Bash is, please do some research on Bash is one is interested in knowing more about Bash in general.
Git Bash is needed for this project because we'll need to clone a repository (make a copy of the repository) in our local environment and track the versions/iterations of the changes we make to the repository and ultimately, the Drupal site.
GitHub Account with a token or SSH Key Generated
To actually be able to pull, commit and push changes to the repository locally, one needs to authenticate themselves to let GitHub know that you actually have access to the repository and let it permit you to make those changes. This is why an account is needed and the token or SSH key is your method of authentication. One can think of them as passwords for access to make changes.
The same password you used to create an account on GitHub will not be the same "password" that is used for authenticating on Git Bash.
To create a token in GitHub, please follow this tutorial.
To create an SSH key in GitHub, please follow this tutorial.
Note: If you generate a token in GitHub, you can only clone the repository using the HTTPS clone url. On the other hand, if you generate an SSH key instead, you can only clone the repository using the SSH clone url.
Terminal or Command Prompt
Terminal and Command Prompts are windows that allows one to perform operations/tasks to the device by using a text-based user interface instead of a graphic user interface. Simply put, instead of clicking and dragging on files and folders as you would with a graphic user interface on any given device, most of this part of the project will use typed in commands to get the job done instead.
One could find Terminal on macOS and Command Prompt on Windows. This is where the previously installed Git Bash will live and understand the commands you input.
KeePass
KeePass is a password manager that allows one to share account credentials from one to another by sharing a file. One will need to have this downloaded to open up the file requested from the Lab Supervisor.
Password is required to open up the file. Please ask the Lab Supervisor for the password of the file.
Setting Up a Local Server
Saving the Path to MySQL to Bash Profile
To set up the local server, we're going to use MySQL provided by MAMP, but first, we need to configure and save the path to MySQL in our bash profile for easy access of the MySQL commands. Follow these steps below:
- Open up Terminal or Command Prompt
- Navigate to the bin folder within MAMP
- On Mac, the command should be somewhere along the lines of: cd /Applications/MAMP/Library/bin
- On Windows, the command should be somewhere along the lines of: Fill this in
- Type in the command: ls
- You should look for MySQL in this list to confirm that you do have MySQL within MAMP
At this point, one should have found and confirmed that MySQL is available in MAMP that they installed. Now we're going to add this path to our bash profile by completing the steps below:
- Type in the command: open -e ~/.bash_profile
- This will open up a text editor/notepad window for you to put in the path to save
- Type in: export PATH="/Applications/MAMP/Library/bin:$PATH"
- Save the new edits in this file and close the window
- Restart Terminal or Command Prompt by exiting out of the application and opening the application again
- Open up MAMP and start the server
- Type in the Terminal or Command Prompt: mysql
- For Windows users, an error message saying something along the lines of access denied will appear but for mac users, since the default shell is zsh, the additional step of adding the bash profile to the zsh profile is required
To add bash profile in the zsh profile on macOS devices, please follow the steps below:
- Type in the command: touch .zshrc
- Type in the command: open -e .zshrc
- A text editor window should show up at this point.
- Add a new line at in the very beginning and type in: source ~/.bash_profile
- Save the new edits and close the window
- Restart Terminal or Command Prompt by exiting out of the application and opening the application again
- Type in: mysql
- At this point, Terminal would return something along the lines of the same error message above
Adding a User Account to the Local Server
The previous error indicates that the user account you're using on your laptop does not have access to the server. This is correct because there would not have been a user created on your account on the server if you did not previously use MAMP before this project. Therefore, we're going to create a user in the server. For this project, all team members would be using the same account. The credentials to the account can be found in the Database KeePass file. Please make sure you already have access into that file before you resume.
To make a user on the MySQL server, please follow these steps below:
- In Terminal or Command Prompt, type in the command: mysql > create user 'locativesql'@'localhost' identified by '<password for locativesql here>';
- You'll need the password to access the Database KeePass file as well as the password for locativesql user inside this file to put in as the password in this step.
- Type in the command: mysql > create database locative_backend;
- This command creates a space for us to pass in a database file that we'll proceed with later.
- Type in the command: mysql > grant all privileges on locative_backend.* to 'locativesql'@'localhost';
- This command gives ourselves permissions to the space for database that we've previously made.
- Type in the command: exit;
- This exits out of the configuration/making of the user that we were doing/current operations
Log Into the Server as the Newly Created User
Now that we've created a new user account for ourselves on the server, we want to log into the account. Please follow the steps below:
- Type in the command: mysql -u locativesql -p
- Paste in the password for the locativesql user from the KeePass database file
- Type in the command: show databases;
- This will show all the databases that currently lives in this user's server account
- Type in the command: exit;
- This exits out of the current operations
Loading in a Database File to the Server
Up to this point, we've only set up the MySQL server to know who we are as a user on the server and created a space for our database to live. The next step now is to load in a database file into our user server account to let the server know what information to load. At this point, one will need to request for the most recent database file from the Lab Supervisor to download and load in the most recent information from the Drupal site. Please follow the steps below:
- In Terminal or Command Prompt, navigate to the directory where this database file is stored on your local device and type in the command: mysql -u locativesql -p locative_backend < database_file_name.sql
- Paste in the password for the locativesql user from the KeePass database file
- Note: For all macOS users, at this point, you will get an error message that says something along the lines of unknown collation. We will proceed to fix this error in the steps proceeding. In the meantime, Windows users can skip ahead past solving this error to check if the new database file has been loaded.
- To resolve the error for macOS users, type in the command: sed -i '' 's/utf8mb4_0900_ai_ci/utf8mb4_unicode_ci/g' database_file_name.sql
- Type in the command again: mysql -u locativesql -p locative_backend < database_file_name.sql
- Paste in the password for the locativesql user from the KeePass database file
Appoint the New Database File to Our Database
Now that we've loaded database file into our server account, let's check if it's been properly loaded by appointing this file as our database. First, we're going to log into the account again by following the steps below:
- In Terminal or Command Prompt, if you're still in the previous directory where the database file lives, navigate out of it.
- Type in the command: mysql -u locativesql -p
- Paste in the password for the locativesql user from the KeePass database file
- Type in the command: use locative_backend;
- Type in the command: show tables;
At this point, your command line window should be showing a bunch of files. This verifies for us that the database file we've just passed in is appointed and that our server account is using these information.
Getting the Server Files from the GitHub Repository
Now that the database is set up on the server, let's load the actual server files into our local environment so that we can point the server to those files for the steps proceeding. Please follow the steps below:
- Clone this GitHub Repository using either a GitHub token or an SSH key in Terminal or Command Prompt using the command: git clone <paste in repository url>
- Please make sure you're added into the repository as a member as this is a private repository. Contact the Lab Supervisor to be added as a member
- It is better to clone this repository at the default directory that the command line window opens in to avoid running into any permissions issues. (Ex. On mac, when you open a fresh Terminal window, right away, you're at your user directory.)
Once the repository is cloned, you should see a new folder added into wherever you've cloned the repository in. The folder name should be called "data-management-site".
Since there are no sensitive files on the repository but those sensitive files are also essential to have in the folder, we will have to manually overwrite/add more files to the repository folder that will only stay in our local devices. At this point, one should also have had a zip file of the important server files that we need downloaded. We're going to unzip/extract that file to add to the folder and overwrite some files.
Note: These files that will be loaded in will be passed through the .gitignore file to prevent them from being pushed into the repository every time one pushes their changes.
From here, copy all the files from the unzipped file and paste them into the repository folder that was recently cloned.
For duplicated files, don't replace them with the file that's just being pasted in. Instead, abandon those duplicated files.
After all the new files are added, we can now point MAMP to the repository folder and configure the port to launch the Drupal site.

Pointing MAMP to the Correct Folder to Feed to the Server
To point MAMP to the correct folder, please follow the steps below:
- Open up MAMP
- Start the server by pressing "Start"
- Refer to the picture on the right for reference
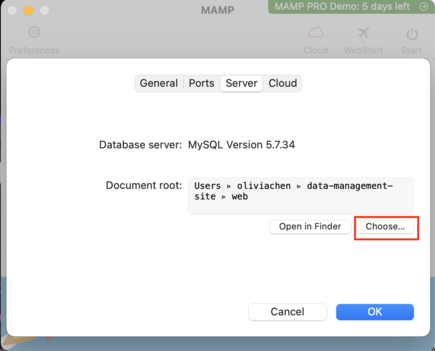
Changing the Path to the Server Folder
- Refer to the picture on the right for reference
- Change the document root by pressing on "Preferences"
- Once in "Preferences", click on "Server"
- Click on "choose" to point the document root to the path to the repository folder
- Click "OK"
- Staying in Preferences, click on "Port"
- Change the Apache Port number to 80
- Change the MySQL Port number to 3306
- Click "OK"
- Stop the server and close MAMP then reopen MAMP
- Start the server by clicking "Start"
- At this point, MAMP will initiate a new browser tab on your browser
- Change the browser url to "localhost:80"

Once the browser url is changed to localhost:80, the Drupal site should be showing up. One is free to resume and proceed with the rest of the tasks to perform on this site per usual.
Pulling Changes from the GitHub Repository
One would pull from the GitHub repository as usual as we can assure that whoever pushed a database file last will not have sensitive data included. There will always be a .sql file on the repo to pull from and that file will be used to replace the current database after pulling the changes.
Pushing Changes from the GitHub Repository
Since we want to make sure that sensitive data are not included from the database file export, we have to export specific parts of the database. Please refer to this section before resuming to push for reference to which files to include in the database export.
Replacing a Database File with a New Database File
Please refer to this tutorial for how to import and/or export database files.
Note: This link may require permission to access.