Documentation:Digital Tattoo Student Orientation/Stop Motion Video
Stop Motion Animation Documentation TBYI: Data Mining
What is stop motion?
Stop motion is a video animation technique that is used to make still images appear to move and/or transition on their own. Images, objects, and text are moved in small increments and photographed in individual frames, creating the illusion of movement when the series of frames is played in a continuous sequence. We were inspired to create a stop motion video after viewing a similarly styled film by a group of fourth year pharmacy students at UBC. The presentation was titled Adderall: Can it boost your GPA? and is an excellent example of an amateur stop motion video. It can be viewed by clicking the link above.
We have broken down the stop motion creation process into three segments: preproduction, production, and postproduction, referring to the stages in the video creation process. The preproduction and production segments were mainly completed by Katie Kalk and Marga Heras - Digital Tattoo Student Project Team , whereas the postproduction editing was mainly the work of Kimberly Kao, the CTLT Arts Co-op student, who had access to the video editing software.
Pre-production
1. Determine your video topic.
- As with all Think Before You Ink videos, a topic must be determined before production can begin. Topics are either determined based on new or relevant online trends, or based on areas that are lacking multimedia content on the website.
- Consult full project team for insight into which topics to pursue.
2. Create the script.
- For all of our video scripts, we utilized Google Docs to share the material between the DT project coordinators and the CTLT coop student. We found that this was the most efficient way to work on the script simultaneously and share it with all project coordinators.
- The script should be between 36 pages in length, depending on the length of the video that you wish to create. For the Think Before You Ink (TBYI) series the ideal video length is roughly 3:30 minutes long. Try not to bore your audience!
- Before writing the script, we conducted an ample amount of research on our chosen topic. We compiled the research in our Google Doc for the team to view, and then broke this research into key points. This laid the foundation for our script and helped us to remain organized while planning our ideas.
- After getting a better idea of the topic at hand, we created a script layout for our ideas, in which we highlighted the key topic areas and how they relate to digital identity and digital citizenship. We ensured that for each layout point, we had adequate research to back up our narration. An example of a general script layout is shown below.
Example Script Layout Data Mining:
- What is data mining?
- What can data mining do / What is it used for?
- How does data mining work?
- Data mining technologies
- Real world examples
- Privacy concerns
- Tips & tricks to limit personal data collection
- Reflection questions
Once the topic research has been completed and the general layout has been established, its finally time to start writing your script! It is useful to write the script in a table format, similar to the sample below. When creating the stop motion video, we split the script into three columns, titled “Voiceover”, “Images”, and “Image Flow”, referring to the spoken narration, image cutouts, and image movement, respectively. For videos with two narrators, we used different rows to differentiate between who was speaking.
- The first column that must be completed is the “Voiceover” (narration) column.
- As mentioned above, it is useful to create different rows within the table to
differentiate between narrators. Creating small sections will also be useful for splitting up the illustration process once the script has been written (see “Image” and “Image flow” sections below).
| Voiceover | Images | Image Flow |
|---|---|---|
| KK: On this installment of TBYI... | --Digital Tattoo Logo -- 4 stick characters (waving x2, nonwaving x2) | --Logo slowing moving to centre from left corner --KK & MH characters appear in shot & wave as they are speaking |
| MH: ...such as Facebook, Twitter, Instagram, and... | --Facebook logo -- Twitter logo --Instagram logo | Each logo appears on screen as they are being read → logos appear in a horizontal line |
When writing the script, remember to follow the script layout you created earlier in the preproduction process. This will help you stay on topic and ensure that you answer all questions relating to the Digital Tattoo Project.
The goal of the TBYI video series and the Digital Tattoo Project is to provide individuals with the information and resources to make their own decisions around the consumption and creation of digital information. It is our job to inform, not to lecture, so do your best to create an unbiased script.
- Try to keep the video fun! Don’t be afraid to throw in a witty pun or corny joke or two!
- An example of script can be found here: https://docs.google.com/document/d/1FJOTFFLHbPm3IkcSVxWi3yjaeRzg8_m1 HD3AgLZ9w/edit?usp=sharing
Now that you’ve written your script, it is time to flesh out the “Image” column:
- The image column will note what images you wish to use during each script
segment (separated by rows). The table above depicts an example of this column.
We used 2 types of images for our stop motion video: paper cutouts and whiteboard drawings.
- These drawings can be as simple or as professional as you please. We opted for animated, cartoonlike images drawn with felt pens and pencil crayons. Regardless of what angle you choose, it is important to pick a style and then stick with it throughout the film. It is also a good idea to draw your images with heavy black borders, as it adds clarity and definition to the images.
- The image can be drawn on any kind of paper. We used plain white printer paper and imperfect, round cuts to create a cartoonish look.
- If you are planning on shooting on a vertical, wallmounted white board, you will need to put magnets on the back of your images to secure them to the whiteboard surface and to move them around with ease. We utilized a roll of adhesive magnets, purchased at Dollarama, and cut small pieces of the roll to stick to the back of our drawings.
- Think carefully about the sequence you wish to illustrate and exactly how many images and what kind of images you need to make that happen. For example, if you want to have two characters that look like they’re waving (as seen above), this will require at least four stick figures: two characters in neutral position and two with their arms up, as if waving.
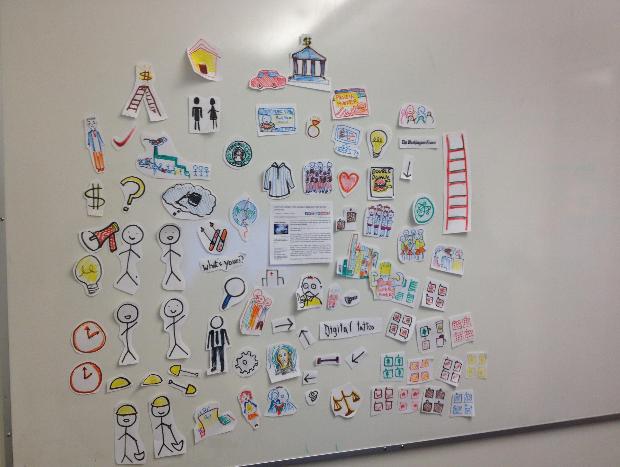
- To illustrate our video, we used over 60 handrawn paper cutouts, some of which can be seen below:

Whiteboard Drawings:
- In addition to paper cutouts, we drew images and wrote words on the
whiteboard to enhance our stop motion video. For instance, we drew a computer screen, keyboard, and computer mouse on the whiteboard to help us illustrate a student using the Connect browser. We also used the whiteboard to draw question marks, write out titles and headings, and emphasize certain images or patterns.
- When drawing on the whiteboard, try to use new markers for better image quality. Also, wipe down the whiteboard thoroughly between drawings so that the background colour of your photographs is not affected.
- The majority of our whiteboard images were used to enhance or complement paper drawings, and thus, falls under the “Image Flow” category.
At last, you’re finally ready to move on to the “Image Flow” column!
- The flow column is where you describe exactly what you want your images to
“do”. That is, what movement path must your image follow in order to complement and/or explain your narration?
- Be explicit and write out exactly what you want to see happen. How does the image appear on screen? How do you want your image to move? Do you want your hands to appear on screen?
- While creating this column, you may find that additional images need to be created in order to establish better flow. Don’t forget to record these images into the “Image” column!
- Try to think of creative ways of illustrating your point!
Throughout the script creation process each column will need to be edited and reedited as the illustrations are developed. Be flexible with your column content and expect to make changes as time goes on. Don’t be disheartened by the number of changes you have to make it’s all part of the creative process!
3. Prepare for Production
Paper Cutouts:
- Before taking any photographs of your images, you need to create your images! As outlined above, you can use any artistic tools (pencil crayons, felt pens, sharpies, etc.) to create your drawings, but we recommend drawing your images with heavy black borders, as it adds clarity and definition.
- Once these drawings are complete, cut them out in the style that best suits your video. Again, we chose to cut out our images imperfectly to go along with our amateur cartoon look.
- Be sure to store all of your images together in a safe place, such as a large envelope, to keep from losing them.
Equipment:
- Camera: The most important piece of equipment you need to create a stop
motion video is... a camera! Since the CTLT and CLC only have video cameras, we rented a Canon T3 DSLR camera from the CSI&C (Centre for Student Involvement and Careers) at Brock Hall. We recommend a camera of equal or greater quality, as well as one that is able to take rapid fire photography. Since image quality differs on varying devices, try to use the same camera throughout to avoid having to edit images postproduction.
- Note: Cameras can be rented from the CSI&C for up to one week. Be sure to ask when the camera is available and plan out your filming / photographing schedule accordingly.
- Memory Card: To create our stop motion video, we shot over 1,000 photos. Since we were using the camera on a rental basis, we used our own 16GB memory card to store our photos. You can borrow a memory card from the CTLT, but be sure to delete the images off of the card once you upload them to the workstation and external hard drive.
- Tripod: If you’re filming on a wall hung whiteboard, a tripod is essential to the creation process, as it ensures that each image is shot within the same background frame. You might also mount a tripod over a white board that sits flat on a table - which may offer better lighting control.
- Whiteboard: Before taking any photographs, you must decide what angle you want to shoot from. We shot our video straight on, using a wall mounted whiteboard, whereas the Pharmacy students’ “Health Animated” video (linked on pg.1) was shot from above, using a whiteboard that was placed flat on the ground.
- Markers: As mentioned in the “Image Flow” section, try to use fresh markers when drawing images on the whiteboard.
Rooms:
- The IKBLC has many excellent rooms to choose from! All of IKB’s silent study rooms on the 3rd and 4th floors have wallmounted whiteboards, but your images may be subject to glare and weather conditions, given that the rooms have many windows.
- Regardless of where you choose to shoot, don’t forget to book the room well in advance of your production date!
- We strongly recommend shooting all of your photographs in the same location, as it ensures uniformity in the image backgrounds and lighting, and eliminates unnecessary postproduction photo editing.
Rehearse:
- Before you take any photos, schedule a date to run through the script and image movement with your team. Have one person read the script while the others move and draw the images across the whiteboard, following the “Image Flow” column of the script. This process will help you discover new issues with your script, images, or image flow, and will give you some time to make the necessary changes before actual photographing begins.
Production: Photographs & Audio
Taking Photographs.
- Once you have run through the script and image movements, you can start taking photos for your video. This process should take roughly 34 hours, and will depend on the number of images you take, the length of your video, and how wellrehearsed your team is.
- The more pictures, the better! We strongly recommend taking as many pictures as possible, as we often underestimated the number of photos we would need to complete a sequence. We found that the more photos we had to illustrate movement (Ex. Digital Tattoo logo moving from point A to point B), the better it looked.
- We captured our images using 2 different techniques:
- Using the “shotbyshot” technique, we took individual photographs of still drawings we would move the image slightly each time we took a picture, creating the illusion that the image was moving on it’s own.
- The second technique we employed made use of the DSLR’s rapid fire setting. The autotimed high framerate pictures were ideal for sequences with quick transitions, and for writing words and highlighting images using dry erase markers.
ShotByShot
- Be sure to place the camera securely on the tripod and assign one person
to shoot all of the photos. This is important for having consistent framing throughout all of the shots in a sequence.
- Make sure that the image is in focus before you take a photo. DSLR
cameras autofocus and easily lose focus on the flat white background. We had to retake several sequences because we assumed that the images were in focus when, in reality, they were not.
Rapid Fire
- Similar to the shotbyshot technique, ensure that the camera is placed
securely on the tripod and the photos are in focus before beginning to shoot.
- Go into the camera’s timer settings and select the rapid fire feature.
- Take as many rapid shots as your camera allows, while your team
member is moving the images around / creating images on the whiteboard. The camera we used could only take 10 shots at a time, so we often had to pause during a sequence, restart the rapidfire process, and then finish the sequence of images in 2 or 3 takes.
Whiteboard Images / Text:
- Choose one person to be the artist / calligrapher throughout filming. This
consistency of handwriting creates a cleaner narrative.
6. More Photographs.
- After you have finished taking your initial set of photos, transfer the images to the workstation computer and watch the slideshow of images (in succession) while reading through the script.
- If there are any points where Is there a point in time that an image is static for too long? No image should be static for over four seconds.
- Take more images to create more motion.
- Sets of images (up/down, sidetoside) can create action out of two stills.
7. Sound Recording.
Location
- The Digital Media rooms on the 3rd floor of IKBLC are perfect for sound recording.
They have soundproof walls and have Final Cut Pro installed on their insuite computers. You can book these rooms through your CWL login following the link below: http://www.ikebarberlearningcentre.ubc.ca/facilities/roombooking/digitalmediaro omsusageguidelines/
Tools
- We used Audacity to record the sound for our stop motion animation. Audacity is
open source for Mac and PCs. (http://audacity.sourceforge.net/)
Takes
- We decided to cut up our audio into three large chunks. This way we could spend less time on editing audio content. First we attempted to complete the audio in one take but that proved to be too difficult to record without making a mistake.
- Remember to speak slowly. We discovered that we tended to rush while we spoke.
Post-Production
8. Music
- Instrumental music is best as it doesn’t drown out the script.
- Look for background music with a Creative Commons license. Do not use any copyrighted music as YouTube will remove your video.
- Resources for Creative Commons Music
- Jamendo: http://www.jamendo.com/en
- The Free Music Archive: http://freemusicarchive.org/curator/creative_commons/
- YouTube, Use search filter ‘Creative Commons”:
http://www.youtube.com/results?filters=creativecommons&search_query=instrumental+music&lclk=creativecommons iv. Attribute correctly in your video.
Matching sound and image
- Again recording in chunks was helpful for editing and helped to easily match up sound and image
Editing
- Realized that certain initial series of pictures weren’t working well or there
was spots with nothing happening so we created hand drawn animations to fill the gaps.
- Used Explained Everything app on an ipad to do this.
- Photos came out discolored from each other. Was able to fix this on Finalcutpro (or photoshop) but to certain point and can be extremely time consuming. Having the correct camera that is good in still shots would have been superb i.e. a DLSR.
- Ensure that the dimensions of images are or will match the dimensions of the video appropriately.
- Make sure to allot enough time in postproduction. This took 75% of our project time.
Uploading to Youtube
- upload to your channel (in our case it is digitaltattoo on YouTube)
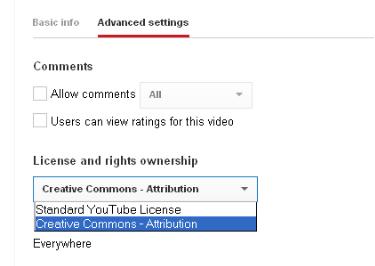
- Set the video’s license and rights ownership to Creative Commons.
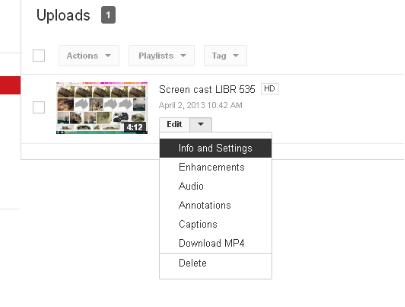
- Under uploads select the videos Info and Settings.

- In the advanced settings menu. Find the Licenses and Rights Ownership drop down menu and select “Creative Commons Attribution”. Click save changes.
