Documentation:CTLT Secure Print Instruction
Secure Print Instructions for Xerox WorkCentre 7845
CTLT’s photocopiers allow you to ensure the physical security of your documents by requiring that a PIN be entered at the photocopier before a document begins to print. This allows you to print a document from your computer and then walk to the printer before the document begins printing, preventing others from viewing the document before you arrive.
There are two steps to perform a Secure Print:
- Choose the Secure Print option within your application
- Release the print job at the photocopier
Mac OS instructions for enabling Secure Print
- The following instructions apply to Microsoft Word 2011 Mac Version - however you can Secure Print within other applications.
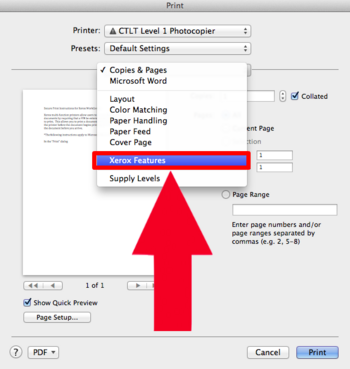
- Step 1: Open the “Print…” dialog when you are ready to print
- Step 2: Find and select “Xerox Features” by expanding the third drop down list. (Not printing from Word 2011? The Xerox Features option is typically found under the third or fourth drop down box within the Print dialog box within other applications.)
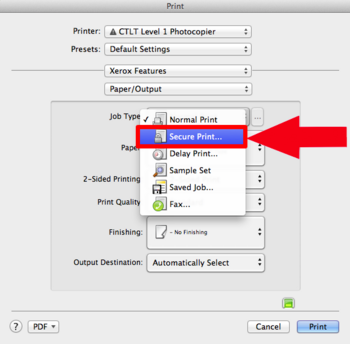
- Step 3: Expand the “Job Type” drop down list to select “Secure Print”
- Step 4: A new window will pop for you to enter a passcode
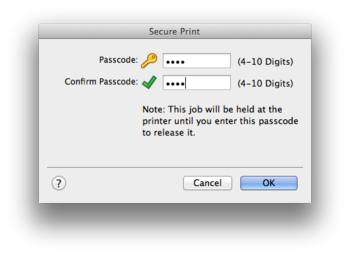
- Step 5: Click “OK” then “Print” to send the job to the Photocopier
- Step 6: After your print job has been sent, you will need to release it at the Photocopier


Windows instructions for enabling Secure Print
- The following instructions apply to Microsoft Word 2013 Windows Version
- Note: You can Secure Print from other programs as well. This option is usually under “Print Properties” or “Preferences” within the Print menu
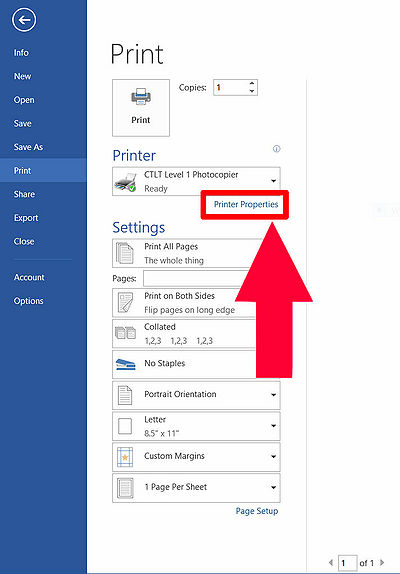
- Step 1: Open the “Print” dialog when you are ready to print
- Step 2: Click on “Printer Properties”
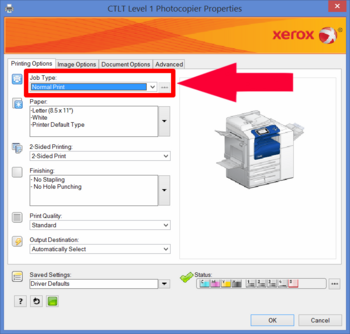
- Step 3: Expand the “Job Type” drop down list to select “Secure Print”
- Step 4: A new window will pop up for you to enter a passcode
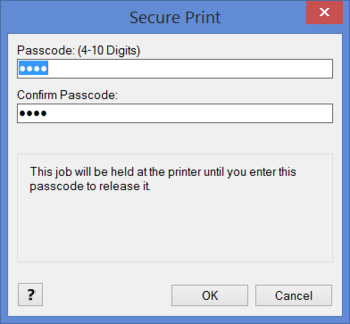
- Step 5: Click “OK”, then “OK”, then “Print” to send the job to the Photocopier
- Step 6: After your print job has been sent, you will need to release it at the Photocopier


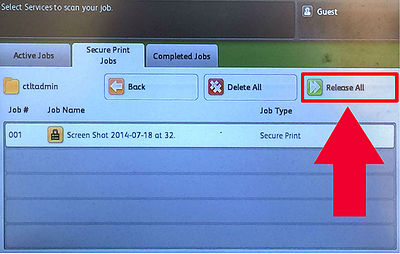
Release Print Job at the Photocopier
- Step 1: When you get to the Photocopier, press the “Job Status” button on the left hand side of the screen to find your printing job
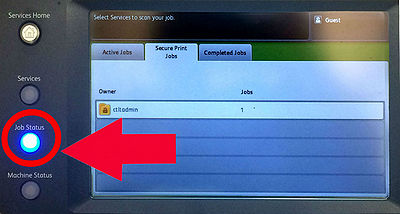
- Step 2: Enter the passcode that you have set, then press “Release All” to print