Documentation:Lessons Learned
Museum of Anthropology (MoA) Models
If the colours of the models are not correct, adjust it in ZBrush:
Goal: Adjust the texture colours in ZBrush so that they match closer to the original. Use the images in the internal > capture folder to view the actual colours of the objects.
1. Import the original texture (do not flip V) and click on the imported image
2. Go to the bottom of the texture menu, and click on Adjust Colours. A new window will pop up. Input the settings as shown in the screenshot.

3. Then, click ok. In the same texture menu, you can export as a .png
4. Continue to optimize the model while preserving the vertex colour (See Colour section). If you have a previously optimized version, then skip step 4 and change the .mtl to the new texture you exported.
Note: If the texture looks too dark, then adjust the HSV intensity and RGB intensity to a higher value.
BONES
Merging Separated Skull and Jaw:
Overview: After individually optimizing the jaw and skull models, the jaw and skull need to be combined to make a full model. The models will need to be appended and reoriented together in Zbrush. They will then be exported to Maya or Blender to be assigned materials and exported again. In the end, this will give one .OBJ and one .MTL file that includes both the skull and jaw models.
Note: Before starting, you should export out a “cleaned up” version of the jaw and skull textures, if applicable. E.g. If the textures were changed in any way, such as writing on the skull was erased, there should be a PNG file that can be used for this part of the process. When you export textures out of ZBrush, you will need to Flip Vertically first, so that it looks right when added onto the models. (Texture > Flip V > Export > [name and save as .PNG])
1.Import both the optimized jaw and optimized skull into the same ZBrush scene.
a. Tool > Import > [Select Jaw or Skull]
b. Click on another subtool on the Tool Menu that is not your model. E.g. click on Cylinder3D. Import the second model. Tool > Import > [Select Jaw or Skull]
c. Can now switch between the jaw and skull by clicking on them under the tool bar.
d. You don’t need to import the textures if they don’t show up. When you export them later, an MTL file will be generated to put the texture file names, so that they show up in 3D viewers..
2. Append the jaw to the skull in the subtool menu. Have the skull selected and go to Subtool > Append > [Click on the jaw model at the top of the pop up]. You can now switch between the jaw and skull by clicking on them under the Subtool menu to the right.
3. It will be easier to orient the final position of the model if the floor is parallel with the bottom of your screen. On the left, toggle on/off the x and z floor rotation buttons and reposition the floor.
4. The skull and jaw will need to be resized and reoriented properly, so toggle on the 3D manipulator by pressing W or click on Move near the top of the screen.
a. Press X to toggle off symmetry (if it is not already off) to prevent the models from being deformed. You should see one red dot moving with the cursor, instead of two.
5. First, click on the lock button icon and re-orient the manipulator using the rings and arrows so that it aligns better with the jaw model, if the jaw is selected. Then toggle the ‘lock’ icon off so the 3D manipulator moves with the model again. Do this for the skull model as well.
6. Position the jaw and skull so that it looks like the image below. Use the rings and arrows on the manipulator to turn and move the model, respectively. The yellow square in the middle is used to resize the model evenly in all directions. Click on the models under the Subtool menu to switch between the jaw and skull.
a. Note the floor is parallel to the screen and that the human head on the top right is facing the right. Your final jaw and skull model needs to face downwards, so that it will position correctly on the project’s internal 3D model viewer.
b. Also note that the 3D manipulator should have the blue arrow face up, green arrow pointing in the direction of the human head, and the red arrow away from you. This will make the model position correctly on the project’s internal 3D model viewer

7. The model can now be exported out of ZBrush. ZPlugin > Subtool Master > Export (visible subtools)> OK
a. You can save it with another name, but the previous name will tag on to the end for an unknown reason. The name does not matter at this point, but you should keep track of what has been exported out of ZBrush.
b. Two MTL and two OBJ files will be exported, one of each for the jaw and skull. The MTL files are not needed.
8. Import both OBJ’s into Maya or Blender. Please see the appropriate headings below, depending on your 3D software choice:
a. Importing and Exporting from Maya
b. Importing and Exporting from Blender
8a. Importing and Exporting from Maya
- Maya 2020 on a PC was used. To open up both the jaw and skull OBJs into Maya, you can either drag and drop the OBJs directly onto the workspace or go to File > Import.
- If after loading the model in, you do not see your model, try to zoom out with your mouse scroll wheel.
- ALT + Left click drag = to rotate
- ALT + Right click drag = to zoom in a smooth manner
- Mouse scroll wheel = to zoom in a stepwise manner
- ALT + Scroll wheel click drag = to pan
- Next, add materials to the jaw and skull, but you do not need to add the textures.
- Left click on the skull to select it and right click hold to open up the menu > Assign New Materials > Standard Surface.
- Under the Standard Surface tab, click on the checkered square beside Color. This will open up a menu. Click on File.
- Do the same for the jaw.
- Select both the jaw and skull for export. Left click on the skull, press and hold SHIFT, and left click on the jaw. Then File > Export Selection. The file name now is important and will be the name that will be visible when the model is uploaded to the project’s internal 3D viewer. Make sure that the file type being exported is OBJexport.
- E.g. 874_optimizedMerged_02
- An OBJ and an MTL file will be exported out. Open the MTL file in Notepad and delete the line “Kd 0.00 0.00 0.00”. Replace it with “map_Kd [originalTextureFile+extension]”. Do the same for the second “Kd 0.00 0.00 0.00” line.
- Note that the top Kd line should point to the texture of the first model you imported into Maya or the first model you assigned the materials attribute to. If the textured do not look correct in the end, just reassign the texture names in the MTL file. You may have forgotten to Flip Vertically when the textures were exported out of ZBrush (see note above).
- Upload the final OBJ, MTL, and a copy of the texture files to the optimization_output folder.
8b. Importing and Exporting from Blender
- Blender 2.82 on a PC was used. To open up both the jaw and skull OBJs into Blender, go to File > Import> Wavefront (.obj).
- Next, add materials to the jaw and skull, but you do not need to add the textures.
- Left click on the skull to select it and go to Material properties tab on the right > Assign New Materials(looks like 2 documents overlapping icon).
- Do the same for the jaw.
- Select both the jaw and skull for export. Left click on the skull, press and hold SHIFT, and left click on the jaw. Then File > Export > Wavefront (.obj). Make sure to tick on Selection Only, and Forward is Z Forward not Z- Forward. The file name now is important and will be the name that will be visible when the model is uploaded to the project’s internal 3D viewer. Make sure that the file type being exported is .obj.
- E.g. 874_optimizedMerged_02
- An OBJ and an MTL file will be exported out. Open the MTL file in Notepad and delete the line “Kd 0.00 0.00 0.00”. Replace it with “map_Kd [originalTextureFile+extension]”. Do the same for the second “Kd 0.00 0.00 0.00” line.
- Note that the top Kd line should point to the texture of the first model you imported into Maya or the first model you assigned the materials attribute to. If the textured do not look correct in the end, just reassign the texture names in the MTL file. You may have forgotten to Flip Vertically when the textures were exported out of ZBrush separately (see note above).
- Upload the final OBJ, MTL, and a copy of the texture files to the optimization_output folder.
Fixing Black Textures on http://ubc.778labs.com/
- Import skull and jaw .obj files into Maya, which should already be positioned correctly from ZBrush
- Assign new materials to skull and jaw, and select “Standard Surface” (Couldn’t find this in Maya 2017, which led to textures not showing). Can import textures to view on model, but it’s not necessary because the mlt file generated will position the textures accordingly.
- Select both skull and jaw > Export Selection. This will give one obj and one mtl file.
Merging Different Areas of the Same Model:
Example - Merging two halves of two scans of the 6906 Coyote Jaw
Background information: Two different scans of the coyote jaw needed to be cut and merged together. One jaw had a poorly scanned backside but well-scanned teeth (Jaw A) and the other jaw had a well-scanned backside but poorly-scanned teeth (Jaw B).

- Opened up ZBrush and under Project, clicked on DynaMesh_Sphere_128
- The two undecimated jaws (Jaw A and Jaw B) were imported into the same ZBrush file.
- From the reconstructed_output folder, Jaw A was imported (Tool > Import)
- Clicked on the cylinder model under Tools, so that Jaw B can be imported to replace the cylinder.
- Using the SelectLasso tool (pressing B, then S, then L), the good backside of Jaw B was selected, by holding CTRL + SHIFT + Left click drag over the area to select. The rest of the hidden jaw was deleted by going to Tool > Geometry > Modify Topology > Del Hidden
- To make both sides of the cut model visible, go to Tool > Display Properties > Toggle on “Double”
- Similarly, Step 8 was repeated on Jaw A to select the teeth portion and delete the backside.

- While Jaw A was on the main screen, Jaw B was appended to the scene by going to the Jaw A’s Subtool > Append > [Select Jaw B]. Both subtools were then visible under the Subtool menu.
- The Move selection near the top left was toggled on. It is also known as the Transpose tool (B > T > R)
- Using the 3D manipulator, which is now visible, the two jaw pieces were rotated, scaled, and positioned together as best as possible, by eyeballing their positions. Some parts were lightly overlapping. The ‘lock’ icon was toggled on for repositioning the 3D manipulator, so it aligned better with the model. Then toggled the ‘lock’ icon off so the 3D manipulator moves with the model.
- Once satisfied, Zplugin > SubTool Master > Merge. ‘Preserve existing Polygroups’ and ‘Merge and delete extra SubTools’ were selected. This gave a single, merged model.
- Next, the texture file for only one of the jaws (Jaw A) was imported and placed on the merged model because the other jaw didn't have a texture file. Texture > Import > [select texture file] > Flip V. To add to the model, Tool > Texture > Click on the texture square > select texture file.
- The identification numbers were painted over using the ZPlugin > Projection Master tool. “Fade” was deselected > Drop Now
- Tool > SingleLayerBrush > ClonerBrush
- At the top, toggle off A, Mrgb, and Zadd, but toggle on Rgb
- CTRL + Clicked on the part of the texture for cloning to paint over the text. Left click + Drag to start painting over the text. Every so often, lifted the left click and re-left clicked + Drag to restart cloning paint. The size of the brush was adjusted with the ‘s’ key.
- When done, Projection Master > Pickup Now. Steps 6 and 7 were repeated for other areas of the merged jaw.
- When done, Tool > Texture Map > Clone Texture.
- To export this new texture, Texture > Flip V > Export > [rename and save as PNG] (For some reason, the texture needs to be flipped vertically before export, so it shows up correctly on the model)
- Export the merged model by going to Tool > Export > [rename and save as OBJ]. An .OBJ, .mtl, and .BMP file will be exported. The .BMP file can be deleted.
- The ZBrush file can then be saved. The merged jaw was then used to combine with the skull.
SOIL
Soil Monoliths:
Orientation:
Darkest layer of soil should be on the top
Details:
Decimated at 25 - 33% should is the magic number to retain detail on the soil monoliths
Cropping:
After cropping the monoliths, use ‘Close Holes’ to automatically patch up the underside of the model. Any areas that ‘closed holes’ will automatically be assigned a new poly group. This means, you can mask-select this polygroup and use the transpose tools to stretch/adjust the depth of the monolith, as well as pulling it out will prevent clipping into the soil.
Optimization:
For some monoliths, when you ‘Close Holes’ in ZBrush, the texture may appear ‘noisy’ or grainy. If this happens:
- Undo
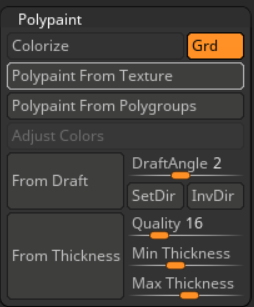
- go to Polypaint > Polypaint from Texture
- Then use ‘Close Holes’
- Go to Texture
- Reapply original texture
- Should be fixed
Sketchfab:
If model isn’t upright, use Straighten model to rotate the model
For background, set to Environment.
For lighting, toggle on lights:
- use 3 point lighting
- First light is pointed up at the monolith and facing the soil at 45 degrees. Light intensity is at about 50%. White.
- This light is our key light, providing most of the visible detail of the soil
- Second light is pointed down at 45 degrees and facing the left side of model. Light intensity is at about 50%. White.
- This light is our fill light, creating a little more definition in the details and filling in the shadows from above
- Third light is pointed down at 15 degrees and the top of the model. Light intensity is 75%. White.
- This light provides rim lighting, or the edge highlights from the top, outlining further details
Other Sketchfab Documentation
- Preparing Models on Sketchfab
- When adding and saving a new image background to the Sketchfab models, a pop up might appear saying that an unexpected error occurs. When this happens, just save it again or until the save is successful.
- Public vs. Private Sketchfab Models
- When models are set to public and downloadable, the upload credits increase for every model you set to public and downloadable. Sketchfab says that with public models:
- Anyone can access this model.
- Your model will be available in Sketchfab search.
- Your model will be indexed by search engines and will be searchable.
- When models are set to private link, free download, and published privately, upload credits are used for every model set like this. But re-setting them to public, the upload credit used will be added back.
- The best way to move models from one Sketchfab account into another is to contact Sketchfab (support@sketchfab.com) and ask them to transfer them.
- When models are set to public and downloadable, the upload credits increase for every model you set to public and downloadable. Sketchfab says that with public models:
- Downloading Sketchfab Models
- Even though the models are set to public and downloadable, one must have a Sketchfab account to download them. Instead of logging in to the instructor’s Sketchfab account to download the models, students can make their own free account to download them.
- To download a model, click the download button and select Original Format (obj). This will download a zipped file, which you can then extract (see next steps).

- To open the downloaded model, navigate to source > [zipped file name]. Click into [zipped file name] and you will see an .OBJ, .MTL, and one or more .PNG files.
- Select all the files in it and extract all. There should be a button nearby for you to “extract all” or “extract”. Click OK when the popup appears.
- Open the extracted files in your preferred 3D viewer.
- Viewing Your Downloaded Models
- You can use the Meshlab software to view your downloaded models. Meshlab is free to download at <https://www.meshlab.net/>
- In Meshlab, go to File > Import Mesh. Find and click on the .OBJ file. The model with its textures will be visible.
- To hide the 3D manipulator, go to View > Show > Trackball
- Left click + Drag = Rotate
- Middle mouse button = Pan
- Scroll wheel = Zoom in/out
COLOUR
Sometimes the appearance of the model may be inaccurate. This can be due to the fact that the reconstructed model has vertex colours and gets lost in the process of optimization (See the section “Process and Results of Model Viewer Testing”).
There are two ways to optimize a model while preserving vertex colour information:
- Duplicate, decimate, PA
- In ZBrush, duplicate the original model
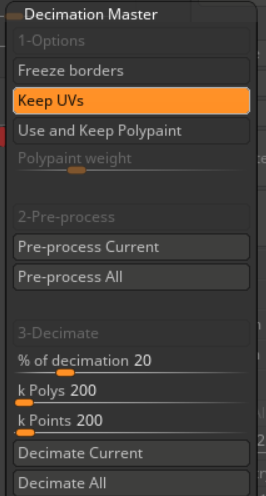
- Then when you decimate, make sure ‘Keep UVs’ is on
- You will notice the vertex colour will disappear, then make sure your original model and duplicated model are in the same position, and both are visible
- Go to Subtool> Project > Project All with geometry toggled off, and color toggled on. Make sure Mrgb is toggled on at the top


- The vertex colour from the original model should’ve been transferred!


- Duplicate,Texture from Polypaint, Decimate, Polypaint Texture
- In ZBrush, duplicate the original model
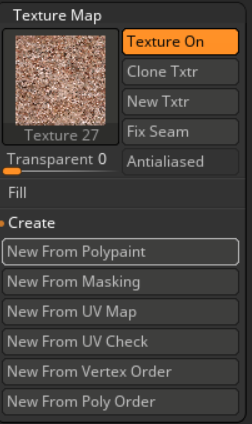
- Then go to Texture> New From Polypaint, this will create a texture file from the vertex colours
- Continue to decimate with ‘Keep UVs’ on
- Then with the vertex coloured texture loaded in, go to Polypaint>Polypaint from Texture, this will paint the vertex colours back on to the vertice
- Vertex colours are transferred!


Process and Results of Model Viewer Testing
Overview: Because of colour problems (models looked like they were viewed through a grey filter) when viewing models on the 3D model viewer and on Sketchfab, tests were done to try and pinpoint the problem. Two separate tests were done.
First test: At first, it was thought that exporting models out of ZBrush affected the colours, so various models and ways of exporting from ZBrush were tested. The decimate models were also thought to affect the colours. The models were then uploaded to the model viewer and Sketchfab for comparison. An online 3D viewer (3dviewer.net) was used as another source of control. The four highlighted models in the screenshots below were given to Mike Suchanek so he could analyze the OBJ files.
In the screenshots below:
Original means directly uploading the files from the reconstruction_output folder.
ZBrush exported means loading the original OBJ model into ZBrush and exporting out the models as OBJs again (no decimation, no textures imported). The MTL files produced from ZBrush were edited to ‘point’ to the original PNG file.
Decimated means decimating using the usual ZBrush decimating procedure (Select “Keep UV’s > Pre-Process Current > Decimate)


Summary of findings for first test
- Exporting out of ZBrush affected the colours viewed only on Mike’s 3D model viewer
- Decimation with ZBrush affected the colours viewed on Sketchfab and on Mike’s 3D model viewer (because the models were exported out of ZBrush)
- Mike’s findings with the OBJ files:
- “The original OBJ file (produced by RealityCapture) specifies vertex colors (an RGB value for each vertex), but when Zbrush exports an OBJ, it does not. As a result, the rendered appearance of the "original" model is a combination of each vertex color + its texture, whereas the appearance of the Zbrush-exported OBJ is entirely derived from the texture.”
- “It looks like realitycapture is able to export without the model vertex colors. That said, I'm not sure if it will bake the would-be vertex colors.”
Second test: Two methods were tested on decimated models to try and solve the colour issue on the model viewer and on Sketchfab. It was also found out that we could adjust the Sketchfab light settings to solve the colour issue with the models on Sketchfab.
W wrote: “On sketchfab I changed the PBR workflow to 'Specular' from 'Metalness (default)' and it seems like it fixed it”

Summary of findings for second test
- Texture problems with Sketchfab can be solved by keeping the vertex colours (on ZBrush) and changing the PBR workflow (on Sketchfab)
- Texture problems with the model viewer are still present (Models from ZBrush appear faded in colour)(highlighted red in screenshot above).
W provided some more information about the vertex colours and PBR (Physically based rendering) workflow:
- “The appearance of the texture is different because the original texture uses a different PBR workflow than the output of most 3d programs.”
- “There are several different types of PBR workflows that calculate and process textures and maps differently with the interaction of light. In other words, in a Metalness PBR workflow, it uses the basecolour texture map's RGB to display and use the alpha (A) channel for transparency, however in a Specular PBR workflow (common for Unity users), it uses the texture map's RGB to display and the alpha (A) to determine specular/glossiness (how it is lightened).”
Other
Sketchfab Process:

- Create .zip file of the folder containing texture, .mtl, and .obj
- Make sure your total file size is <200mb
- Upload ZIP file to Sketchfab account
- Set privacy to ‘private link’ or ‘password protected’
- DO NOT PUBLISH. SAVE instead.
- Done
Note: Refer to ‘Primary Axis’ draft model for orientation. Orientation is based on however you see it in programs (including ZBrush)
CHRIS AND COLE’S SKULLS
Skull and Jaw models
Objectives
- Keep the most important features high quality: Teeth
- Students need to be able to clearly see the teeth and the top of the skull (the ridge area) for all the specimens. Retaining high resolution is important.
- Models hinged/merged at the back, but have the jaw wide open
- Decimate areas except for primary features
- Blur out/erase numbers and identifying names on specimens in the digital model
Summary
- Z-brush is primarily used to decimate and clean up models, as well as orient
- Z-modeler can be used to refine geometry issues in z-brush
- Z-brush polypaint can also be used to revise the texture (blurring out numbers/marks on specimen)
- Otherwise, Blender/Maya is a great inbetween for geometrical and texture issues, and can be used for orientation as well
- Blender/Maya is used to export, texture must be relinked
General notes
- When saving in zbrush if you save the whole file (File > Save as), it’ll crash when it’s too large. Save “tool” to save changes only (Tool > Save as)
- Export objs to save a modified version of your model. This is not to say that you shouldn’t save a maya or blender file, but the obj files will be a reliable back up.
- If the zbrush, maya or blender file is too big, it will crash when you try to open it and you may lose your progress.
- Save textures after modifying (save the image file before the program file after modifying to prevent lost work if the program file crashes when trying to save the whole file
- Modifying the jaw/skull individually before importing into same file will also help mitigate crashes
- Try to use png file textures, helps mitigate crashes
Selectively Decimate models in Z brush
- Mask areas where you want to preserve the polycount.
- To make your mask a 'softer' selections, hold CTRL and click on the model. This will smooth your masking.
Merging models
https://www.youtube.com/watch?v=KoyaXLYByIs
- Fit the two pieces (Skull and Jaw), in a closed position and use this position to gage the scale of each piece
- Hinge
- Merge objects by merging subtools! Before you do this, make sure you orient the models properly with the transpose tools (move, rotate, scale)
Missing texture, merged object in Zbrush:
- Merging object in ZBrush, for some reason it doesn't connect both textures when exported. Zbrush files cannot read multiple textures.
However the fix (and what we should do for all MOPT types):
After orienting the parts together
2. Export models as separate subtools
3. import into Blender or Maya
4. Assign separate materials and the corresponding textures to each part
5. reexport everything together as an .obj
6. should read all textures in a single file now
Export as separate subtools
- ZPlugins, use Subtool Master>Export, and check export visible subtools
Saving in ZBrush:
If you save the whole file (File > Save as), it’ll crash when it’s too large. Save “tool” to save changes only (Tool > Save as).
Zbrush - Blender workflow
Although z-brush can do most things including fixing geometry and modifying texture, you can also choose to do some of those things in blender. Here is the workflow:
- Import jaw to zbrush, mask areas to preserve high polycount and decimate, resolve any geometrical issues, export.
- Import skull to zbrush, mask areas to preserve high polycount and decimate, resolve any geometrical issues, export.
- Fixing geometrical issues (holes) in zbrush
- Place a sphere → scale into a disc to fit the hole and use sculpt tools to desired effect
- Merge Down, Keep UVs → sometimes does weird things and ends up connecting weird parts of the UV map
- Fixing geometrical issues (holes) in zbrush
- Options:
- Import both objects into zbrush and orient, export and open up in for final export in blender where you can also modify texture.
- Import both objects into blender, orient, fix geometrical issues, texture, and export.
Tips on this process: If you are altering texture/geometry in blender it is best to do this one at a time.
- Fixing geometrical issues in blender (preferred)
- Sometimes the hardest thing to solve is weird holes that appear in the reconstruction phase, which are not automatically removed by “close holes”
- Select edge loops → connect vertex → forms like a flat disc
- Use sculpt tools (inflate, flatten, etc) to achieve the desired results, also usually helps with the texture
- Sometimes the hardest thing to solve is weird holes that appear in the reconstruction phase, which are not automatically removed by “close holes”
- Blurring markings/Modifying texture
- Use texture paint → clone stamp (same as in Psd) → save new image of texture
- When using textures - save as png (allows for greater compression and prevents crashing!!! You may experience crashes if you use bmp)
- Export from blender
- Export selected
- Relink proper textures with direct link after map_Kd texturefile.png
When exporting from Maya:
Change the mtl file exported out of Maya (delete the two Kd 0.00 0.00 0.00 and replace them with the appropriate texture file e.g. map_Kd Texture.png).
Orienting model for model viewer:
In model viewer, you can double click on the model and see the gumball. You can match the model orientation in model viewer in blender/maya to orient it correctly.

Test model: http://ubc.778labs.com/model/tests/PrimaryAxis/PrimaryAxis
Different axis are painted on (left and right side are pointing to the X axis, if you rotate towards the top, it points to the Z axis).
- If you want your model to be viewed upright in the TLEF model viewer, you must ensure that in ZBrush, the model is FACING DOWN Y axis (pointing towards the ground/Ygrid). Then, the left and right sides will be pointing towards the X axis, and the Z axis is actually pointing UP. So in the end, the down Y axis will be facing you.
- Tip: You can quickly go to the bottom view by rotating the bust in the top right corner (Only available in 2020 ver.) OR holding shift while rotating to snap views. To turn on grid, there's a toggle button on the side bar to the right
Commonly needed revisions and way to achieve


Fused Teeth
Used sculpting tools in blender (Draw sharp and crease) to create separation. Used texture paint to create increased differentiation between the teeth (drawing in shadows). Inflated teeth to create extra differentiation. Smooth the surfaces and top of the teeth to resolve “jagged” teeth issues.

Overexposure of texture
If texture is too bright or too dark - bring the texture file (PNG, etc.) into PSD and change the exposure settings. Then Re Import texture.
Uploading to model viewer:
Open up the VR Room Computer Desktop, click on the ubc.778lab.com icon and find the directory you want to put your model into (The online link will match the directory)


Copy your files into the folder. Make sure all file names are in lowercase letters and there are no spaces (use underscores instead). Double check this, and that there is a direct texture link (texturefile.png) in the mtl file as well.
Using uppercase letters, spaces or an incorrect link in the mtl file will cause either no model to appear in the online model viewer, or black texture (missing texture).
Check your model by following the url
http://ubc.778labs.com/model/collectionname/specimencodespecimencode_optimizedMerged_01
Example: http://ubc.778labs.com/model/beaty/9049/9049_optimizedMerged_01
Naming Conventions: [label]_optimized[OPT=Model, MOPT=Merged, EV=ExView]_[version##]
ANSWERED QUESTIONS
Example and Q/A of merged object

Flip entire model upside down.
In Sketch fab:
You can save a starting camera view in sketchfab instead, as well as free rotation of 360 in any axis.
So, yes, have your model facing down and make sure the Z (blue line) is pointing up when you’re facing your model. Another way to think about this is have the model face the right way as the bust in the top right corner. Then, rotate the model 90 degrees down so it's facing the ground. Then it should be oriented correctly
What about moving transpose arrows independently from model?
That only changes the orientation of your manipulator, it doesn't change the actual pivot point or orientation of your model. You can use the padlock toggle to reorient your manipulator so it's easier to use though. Once unlocked, you can press the location icon, and the circle arrow icon, to reposition and orient the manipulator to default. From there, you can lock it again and move it accordingly
Review Process:
- Upload to server on VR Room computer
- Make sure all the text in the file names is lower case!
- Post link on google doc
- Once a model is uploaded, notify collaborator on basecamp by starting a message
- Collaborator feedback is done through annotation on model viewer only
- If by any chance a collaborator says that there isn't enough detail on the optimized model
- upload the raw reconstructed model to the server (labeled as the next version with the naming conventions) to receive a second round of reviewing
- If they say that model is great, then no need to do any extra work.
- If they say it's still not good enough, it will be in the hands of the photo scanning team to recapture, and we should upload that raw model to the server as the next version again.
- upload the raw reconstructed model to the server (labeled as the next version with the naming conventions) to receive a second round of reviewing
- If by any chance a collaborator says that there isn't enough detail on the optimized model
- If a collaborator starts complaining about the file size/loading time, please make sure to reiterate to them that the higher amount of detail=larger file size, and if you were to reduce the file size, details would have to be compromised. That being said, you can suggest that we can chop up the model in different parts and upload them separately if that works better for them (ie. a 1GB file would then be chopped up into 0.2GB+0.2GB+0.2GB+0.2GB+0.2GB)
Burning Textures to Models:
Is it possible to burn textures onto the models for students to download as a zip file? During class tests, we discussed that it may be unfair for students with poor internet connections so they can download models beforehand.
It is possible. Mike can also answer part of that question as well. So yes, students will be able to download both the model and texture file as a SINGLE file if it is a .fbx. The texture will be embedded into the model and could be opened by most programs/viewers. However, .fbx are typically larger in size compared to the combination of .obj, .mtl, and .png. Students can download all 3 files instead and should still be able to open the model up as well too. So either option is viable, but if possible, it'd be better if they can download the .obj package so we don't have to reexport all the models.
Emma’s Personal Notes:
Method 1 ( Not a great method)
Import -> object wavefront
Edit mode, delete unwanted parts
Duplicate original
-Keep texture
New (duplicated) mesh
-delete texture
Add modifiers
→ Remesh to (higher number = higher resolution)
- Mode smooth
- Possible to make it even higher res than previous! :O
→ (A) select all and scale points (alt s) slightly to inflate
→ Sculpt → Smooth, inflate
→ Triangulate
→ Decimate
Bake original texture to empty textured, but modified mesh
Method 2 (A better method)
Import -> object wavefront
Edit mode, delete unwanted parts
Duplicate original
-Keep texture
-Edit mode → Mesh → Cleanup
- Decimate geometry
--before cleaning up allows it to work faster
Zbrush
-What to do when there is missing texture.
-Have mutliple scans, allow capture at different angles
-In zbrush align models together
-mask area you want texture, inverse mask
-project texture
-Texture
- create polypaint
-Should generate new texture
Animations
-keyframes left click on position for blender
-80 frames
-autokeying will save changes
-duplicate original keyframes
-align camera to view
-export fbx
Brushes
Z modeler
Edge - space bar - extrude or bridge - target - edges
Hover over an edge -2nd edge bridge
Multiple edges - hover over an edge -
Texturing
Keep UVs
Decimation master, pre process current
Decimate current
Texture import select old tecture, in tab, flip v, load texture in texture map
Flip VS! Super important!
Sometimes in Z-brush holes are not filled by fill holes
→ go to blender
→ select area of hole
→ select edge boundary
→ connect vertices in centre
→ use sculpt tools (inflate, flatten) to make that spot uniform
Animation:
Hey guys, so I noticed for some reason, importing the FBX with animation into Blender doesnt work. However, that file actually works when imported into Maya. It does have the animation and everything. So, if you want to check your fbx after exporting from Blender, either import into Maya (just to check, you might have to press A so your view fits the objects) or view in the default windows 3D viewer. These are my blender export settings just in case:


Uploading

All lowercase!
Blender masking --
UV editing _> texture paint mode → clone stamp
fIX HOLES
FIXING HOLES
PUT AN OBJECT OVER HOLE
MERGE DOWN - MAKE SURE UV IS TOGGLED ON!
FINAL EXPORTS
Blender - import one piece at a time and mask on the one piece (blur numbers) rather than importing both at same time to prevent file crashes, etc.
Sometimes blender will crash when importing the image texture from zbrush. Go to zbrush and export the texture again as a png or something. To export the texture, flip the texture before exporting. This is the reverse process as in
Pinch sculpt tool in blender