Documentation:Wordpress eportfolio session
Workshop Agenda
Introduction: You, Us
- lucas.wright@ubc.ca - Learning Technology Specialist, CTLT
- emily.renoe@ubc.ca - Learning Technology Specialist, CTLT
Session Objectives
Upon completion of this workshops, participants will be able to:
- Identify the components of a teaching portfolio
- Consider artifacts that they can add to their ePortfolio
- Create and add pages and post, categories and tags, images and multimedia
- Customize the appearance of the ePortfolio
- Identify the components of a teaching portfolio
Agenda
- Activity I: Exploring ePortfolios
- Activity II:Components of an ePortfolio
- Activity III:Hands-on, Creating your ePortfolio
- Activity I: Exploring ePortfolios
=Teaching Portfolios
Please note that, throughout the Teaching Portfolios section of the website and wiki, we use the terms "teaching portfolio" and "teaching dossier" interchangeably.
What is a teaching portfolio?
A teaching portfolio is a document that contains carefully selected and assembled materials and representative artifacts of your achievements in teaching. These materials and your accompanying narrative describe and represent your beliefs, thoughtfulness, and innovations in teaching.
Why create a teaching portfolio?
The teaching portfolio can serve many purposes, some of which include:
- To document teaching effectiveness
- To reflect on your approach to teaching (often called your "teaching philosophy")
- An occasion to assess your practices, question your methods, and to plan for the future
- As a formative tool to improve teaching strategies
- As a supplement to the curricula vitae
At UBC-V, portfolios are typically required as part of the tenure and promotion process.
Getting started
If you're getting your portfolio ready for a job application or promotion and tenure, make sure to give yourself plenty of time. Crafting and assembling together a portfolio takes time. Before you start, talk to your department head to fully grasp the process, expectations, and deadlines.
Though starting a portfolio can be a daunting task, there are many resources and guides available to help you. We invite you to read and consider the information provided in the tabs above.
At CTLT, we occasionally offer teaching portfolio workshops.
You may contact us for an individualized one-on-one consultation anytime.
View "Teaching Dossier: An Introduction" (4:21 mins)
Teaching portfolio self-assessment tool
To help you assess your own portfolio, download the Teaching Dossier Self-Assessment Tool (Word). If you'd like to have access to this as a Google document, click here.
Contact
For more information, please contact Dr. Isabeau Iqbal at isabeau.iqbal@ubc.ca
References
Pelger, S., & Larsson, M. (2018). Advancement towards the scholarship of teaching and learning through the writing of teaching portfolios. International Journal for Academic Development, 23(3), 179-191.
Trevitt, C., Stocks, C., & Quinlan, K. M. (2012). Advancing assessment practice in continuing professional learning: Toward a richer understanding of teaching portfolios for learning and assessment. International Journal for Academic Development, 17(2), 163-175.
What Goes Into a Teaching Portfolio?
Typically, a portfolio includes:
- a teaching philosophy statement
- information about your teaching activities
- evidence of, and reflections on, teaching effectiveness
For details see the relevant sections of this site.
The specifics of what you include will depend on:
- the purpose of the portfolio;
- your discipline; and
- the importance assigned to different items by your department and Faculty.
Remember: Your portfolio is a demonstration of the beliefs, values, and approaches you have articulated in your teaching philosophy statement (TPS); consequently, there should be congruence between your TPS and the rest of your portfolio.
Be sure to speak with your department head or other trusted source to find out about the requirements in your context.
References
Little-Wienert, K., & Mazziotti, M. (2018). Twelve tips for creating an academic teaching portfolio. Medical teacher, 40(1), 26-30.
Teaching Philosophy Statement
"A teaching philosophy is a narrative essay which reflects an individual’s beliefs and values about teaching and learning, often including concrete examples of the ways in which that individual enacts those beliefs" (Bowne, 2017, p. 59).
It is typically 1-2 pages in length, written from the first person and in the present tense.
The teaching philosophy statement (TPS) communicates:
- Your approach to teaching
- How your teaching facilitates student learning
- Why you teach the way you do
- The goals you have for yourself and for your students
- How your teaching enacts your beliefs and goals
- What, for you, constitutes evidence of student learning
- The ways in which you create an inclusive learning environment
As appropriate, draw from scholarly literature to help ground the approaches you take and beliefs you hold.
Prompts to Help you Write Your Teaching Philosophy Statement
To assist you in writing your teaching philosophy statement, you may find the questions below helpful:
| Teaching Approach |
|
| Instructor-Student Rapport |
|
| Teaching Goals and Strategies |
|
| Teaching Aspirations |
|
Additional Resources
Here are some more resources to help you get started in writing and evaluating your teaching philosophy statement.
- State Your Teaching Philosophy. Taylor Institute for Teaching and Learning, University of Calgary.
- This is part of a larger resource on creating a teaching dossier. Also includes samples.
- Videos
- Teaching Philosophy Statement: Introduction (3:25): https://youtu.be/PnDWfizxAb4
- Belief Statements in Teaching Philosophies (4:20): https://youtu.be/li91l0hYGws
- 4 Steps to a Memorable Teaching Philosophy, written by James Lang (2010) and featured in the Advice section in the Chronicle of Higher Education.
- Dr. Steve Wolfman (UBC) has put together some excellent resources for creating a tenure packet. Click here for his advice on preparing for/writing the teaching philosophy statement.
Sample Statements from UBC
You can find some teaching philosophy statement examples (and full portfolios) from UBC colleagues here:
- Christina Hendricks, Professor of Teaching, Department of Philosophy, University of British Columbia, CA
- Sarah Leavitt, Assistant Professor, Creative Writing Program, University of British Columbia, CA
- Greg Martin, Professor, Department of Mathematics, University of British Columbia, CA
- Jonathan Verrett, Associate Professor of Teaching, Department of Chemical and Biological Engineering, University of British Columbia, CA
References
Bowne, M. (2017). Developing a Teaching Philosophy. Journal of Effective Teaching, 17(3), 59-63.
Teaching Statements. Center for Teaching. Vanderbilt University.
Documenting Your Teaching Effectiveness and Reflections
This section of your portfolio typically includes various sources of information that, collectively, demonstrate your teaching effectiveness.
In addition to data from outside sources, you will want to include your own reflections about your effectiveness. You may wish to include the ways that you monitor and evaluate your own teaching and reflect on what the evidence gathered tells you about your teaching.
Materials to draw from to document your effectiveness and to reflect on your teaching [1]:
- Summarized student evaluations of teaching, including response rate
- Unsolicited and solicited letters from students (initiated by the unit)
- Written comments from students on class evaluations (please note that, at UBC, the recommendation is against incorporating select comments from students; ie, you need to include all the comments or none)
- Statements from alumni
- Letters from course head, division head or chairperson
- Peer reviews of teaching
- Teaching recognitions such as (1) awards received by your department, institution, and external awards (professional association, national and international teaching awards) and (2) funding received to pursue a teaching initiative. Note: Nominations for awards also indicate your reputation as a teacher.
You may wish to make some concluding remarks that tie together the philosophy, approaches, evidence and evaluative sections. At this point, it is also important to detail a plan for future actions, including your motivation and challenges, as well as short and long-term teaching goals.
Additional Resources
The sample teaching portfolios below incorporate reflection and evaluations of teaching effectiveness:
- Martin Andresen, Professor, School of Criminology, Simon Fraser University, CA
- Jonathan Verrett, Associate Professor of Teaching, Department of Chemical and Biological Engineering (see 2020 Tenure Application tab), University of British Columbia
- Catherine Rawn, Professor of Teaching, Psychology Department, University of British Columbia
References
Paper vs. Electronic
When it comes to developing your teaching portfolio, you will need to decide on a format: it can be in paper or electronic form – some people do both.
The following are some things to consider:
| Electronic | Paper | |
|---|---|---|
| Audience | Who is your target reader? Which format is most accessible to your target audience (i.e. most likely to be read)? Which format does your reader expect/want? | |
| Ability to Customize | Most software allows you to make a duplicate copy of your portfolio, resave with a different name, and edit as necessary, as well as modifying the ‘look and feel’ (colours, fonts and so on). | All relevant documents will need to be resaved with changes and then printed off. |
| Multimedia | Can include pictures, video clips, sound clips, text, images. | Can include text and images. |
| Portability | Content uploaded directly to the web. Can be viewed from any computer with internet access. | As it is a physical document, it is often bulky, consisting of one or more large binders. |
| Security | Variable, depending on the portfolio software: you can invite people to view your portfolio, send a link to your portfolio, make your portfolio public, or keep it private. | Portfolio can be viewed by those whom you give it to in hardcopy format. |
| Ability to demonstrate learning/knowledge construction over time | Yes | Yes |
| Feedback | Depending on the software used to create the portfolio, others may be able to provide you with feedback and you can choose whether to make feedback visible or not to others. | Feedback cannot be easily incorporated into the portfolio unless you add it as a separate document. |
| Potential to encourage interaction (collaboration, communication) | Easy to share as a hyperlink. You can choose to release smaller parts of it to certain people and allow others to view most or all of the material on your portfolio site; you may even pre-set a time span during which a given part of your portfolio can be viewed. | Can be shared by lending the physical copy or printing/photocopying more copies. |
| Flexibility | Yes. Flexibility influenced by choice of software. | Flexible within the constraints of using paper and hardcopy artifacts. |
| Organizing and cataloguing learning materials | Material can be easily organized, catalogued and modified; e-Portfolio software often includes tools for organizing/reorganizing materials. | Materials can be organized, catalogued and modified within their source files (Word, PDF) or by reorganizing the paper copy. |
| Sustainability | In addition to keeping your portfolio updated, regular maintenance may be required to ensure hyperlinks are still live and accurate. It is also important to note there are many ways to navigate through your portfolio and that changing one page may have cascading effects elsewhere. | Sustainability depends on the frequency of updates to portfolio content. |
Educational Leadership
Educational leaders promote meaningful changes that have a deep impact beyond the classroom and documenting your educational leadership activities is necessary for candidates in both the professoriate stream and educational leadership stream. Please do not assume that your educational leadership contributions will be “obvious” to your reader; instead, work to carefully present a case for your contributions, and highlight the impact of your work (with evidence, where possible).
At UBC, a well-constructed teaching portfolio and effective curriculum vitae may be used for merit considerations and in the tenure and promotion process.
The teaching portfolio allows you to meaningfully expand on, and demonstrate the impact of, initiatives (and other information) you have included in your CV.
Please consult with your department head or chair of the tenure and promotion committee to determine exactly what documentation you must supply and in what format.
Portfolios from UBC Educational Leadership Faculty Members
- Silvia Bartolic, Associate Professor of Teaching, Department of Sociology, University of British Columbia
- Christina Hendricks, Professor of Teaching and Academic Director for the UBC Centre for Teaching, Learning and Technology, University of British Columbia
- Catherine Rawn, Professor of Teaching, Psychology Department, University of British Columbia
- Jonathan Verrett, Associate Professor of Teaching, Department of Chemical and Biological Engineering, University of British Columbia
Many thanks to the EL faculty members who have shared their teaching portfolios. If you would like to add your EL portfolio to list, please email Isabeau Iqbal (isabeau[dot]iqbal[at]ubc.ca).
Teaching Dossiers Additional Resources
- Tables of Content: This document contains the tables of content from EL dossiers in various disciplines. These tables of content are from dossiers that were used, at UBC, in the tenure process (promotion from Assistant Professor of Teaching to Associate Professor of Teaching).
- Teaching and Educational Leadership; see this link for practical resources to help you document your educational leadership, collect evidence, and articulate impact. Scroll to the resources section at this page to download the Teaching and Learning Impact Framework and the ELM Tool
- UBC Human Resources: Tenure, Promotion & Reappointment for Faculty Members
- UBC Curriculum Vitae for the Professoriate Stream
- UBC Curriculum Vitae for the Professor of Teaching Stream
Hands-on Activity - Exploring ePortfolio Examples
Work in pairs and look at the two example of teaching portfolios and consider the following questions:
- What is the goal of the ePortfolio?
- Who is the intended audience
- What evidence of their teaching did the author provide?
- Overall impression
- Joanne Fox
- Rebecca Taylor
Components of a Teaching Portfolio
- Determine the components of your ePortfolio according to the intended audience and their expectations
- In the higher education setting the requirements of a teaching portfolio often include the following:
Hands-on Activity - What are the components of a teaching portfolio?
- Work individually and for each of the listed components of a teaching portfolio write down what evidence you could provide for each component. Consider how you might make this evidence available in an online format.
- Debrief: Sharing example of each component
What is WordPress?
WordPress is a platform that can be used to easily create blogs and webspaces. WordPress is a web-based platform that we can access from any computer that is Internet enabled. UBC blogs is a installation of WordPress that is available to the UBC community.
Developing an ePortfolio using WordPress?
WordPress is a blog platform that has been growing in popularity as an ePortfolio tool. Although the WordPress platform requires some work developing the overall structure of the portfolio overall it is easy to use, multiple privacy levels and different ways of contributing content.
- Examples of WordPress as an ePortfolio Tool
- University of Oregon UFolio
- Teacher Education Program UBC, Teaching ePortfolios
Developing a Frame for your ePortfolio?
Using WordPress developing a frame for your portfolio will provide you with a structure that you can use after this session to upload and reflect on artifacts.
Setting up your UBC Blogs account and logging in
- Go to https://blogs.ubc.ca/ (bookmark this for the future!) >> click on the LOGIN button and enter your CWL information.
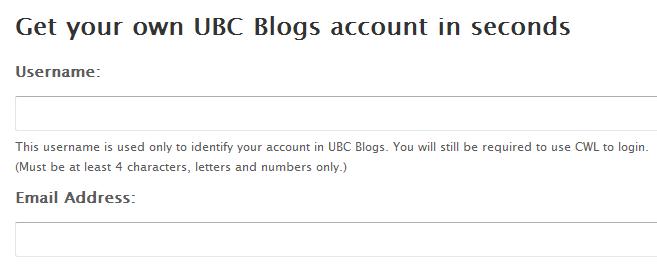
- The “Get your own UBC Blogs account” screen appears
- Enter a Username (only the lowercase letters a-z and numbers allowed), Email address, and Display Name
- Agree to to the terms: "I have read and agree to the terms of service"
- Select "Gimme a Site" and click the NEXT button
Login Info PART II
- Choose a Site Name and Site Title
- The Site Name will become part of your URL and cannot be changed
- Select the Privacy option "I would like my blog to be visible to everyone, including search engines (like Google, Sphere, Technorati) and archivers and in public listings around this site"
- Click the SIGNUP button at the bottom of the page
Orientation to the WordPress platform
Your WordPress Profile Page
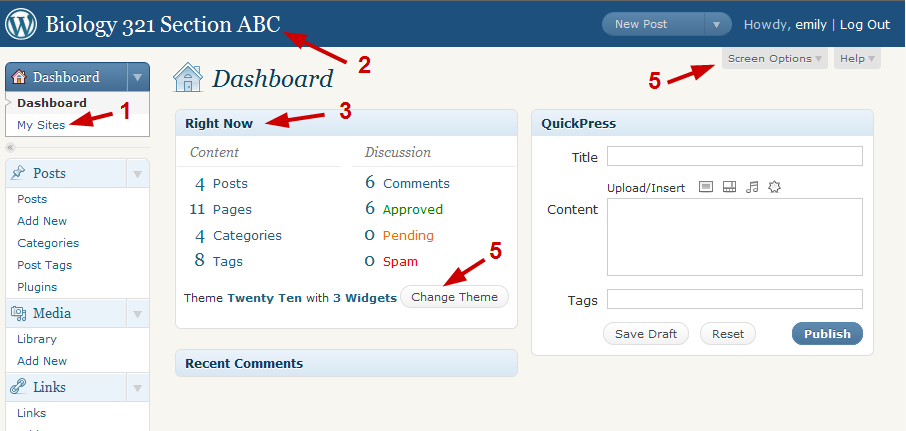
1. The Dashboard (image Figure 1 at right) provides you with the ability to quickly create a new blog, add and manage content.
2. Under My Blogs you will see:
- All your blogs
- Create a Blog
- Access to the Dashboard (the "nerve" central of your blog space).
3. Go to your WordPress dashboard by clicking on the name of your site from the drop-down menu
A Tour of the WordPress Dashboard
The Dashboard is the "nerve" centre of your blog spaces (image Figure 1A at right)
Some important areas are:
1. My Sites - lists the blogs you have access and Create a New Site feature
2.Visit your webspace by clicking on the underlined title
3.Right Now column gives a quick snapshot of how many pages, posts, categories and tags exist
4.The Screen Options button allow you to rearrange your Dashboard page
Pages or posts--two different ways to display content
WordPress employs two fundamental content types: pages and posts. These content types behave quite differently and therefore it is important to understand when to create a page or a post.
Pages are static. They are a good way to publish information that doesn’t change much, like an "About" or "Contact Us" page. Pages are usually linked from the main navigation bar on the Homepage.
Posts are dynamic. Posts are always associated with a date and are really meant to update your audience.
Some key differences:
- Posts are:
- dynamic (you may create a couple of Posts a day!)
- displayed in reverse chronological order (placing the most recent content at the top of the page)
- can be assigned tags and categories (helps with search engines!)
- meant for updating your audience
- are syndicated via RSS
- Pages are:
- static content that will not change - or very, rarely anyways (Examples are 'About Me', 'Contact Me', 'Services', etc.)
- not related to categories or tags
- do not appear in RSS feeds
- may have sub-pages (this gives the appearance of a more traditional website)
Add New Page
Now, let's add two new pages.
- On the left-hand menu bar, under Pages, click Add New.
- The Add New Page screen appears. For this example, create a page called My Teaching Philosophy. Enter some text about your philosophy in the large empty box below the title.
- Click the Kitchen Sink icon to expand the toolbar and format the text.
- Scroll down to the bottom of the page and select whether to enable comments or not
- From the sidebar select whether you would like this page to be a sub-page or a parent page
Hands-on Activity - Developing pages for your ePortfolio
- Create a frame for your teaching portfolio by developing pages for each of the components that you would like to include. Consider whether you would like the pages to be top level or sub-pages. Would you like to allow comments? When this is completed create a page and name it posts. This page will be used to house your site's posts. When
Adding Evidence and Artifacts to Pages
Evidence and artifacts can be added to your ePortfolio in different formats and media. The WordPress platform allows you to upload the following file formats:
- Documents: MS Docs/Docx
- Presentation: PPT, PPTX, Keynote
- Images: JPEGs, GIFs, PNG
- Audio: MP3s....
Add Images and Media to Your Page (or post)
- From the Dashboard, click Pages on the left-hand menu bar.
- Select one of the pages to edit.
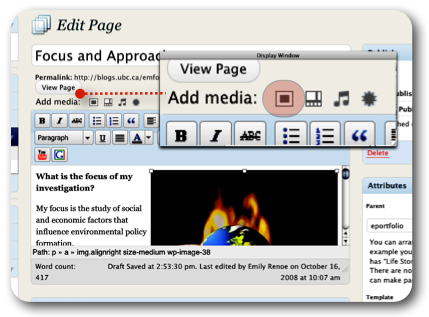
- On the Add Media toolbar click the first icon in the row. (see Figure 5 image at right)
- Add media files from your computer window appears.
- In the Choose files to upload box, click Select Files. From your computer, select an image and click Select (OK on a PC).
- Enter a caption, a description of the image, and select an image size to be displayed on your page. (Note: the default in Full Size). Click Insert into Page.
- When you have finished formating your page, click Update on the far right-hand side and visit your site.
Hands-on Activity - Adding media to your pages
- Go back over the components of a portfolio/evidence chart that you completed earlier. For each of the pieces of evidence that you noted consider how you might convert or link to this artifact. Once you have completed the chart practice adding images and other files to one or more of your pages.
Posts--how can we us them?
The post roll in the WordPress platform is typically used to display more dynamic information. In this session we have focused on creating a page-based portfolio so far. There are a variety of ways that posts can be incorporated into an ePortfolio:
- The portfolio can be post-based, using categories and tags to index the information
Example:Post-Based
- The portfolio can incorporate posts and pages to display artifacts
Example:Post and page based
- The posts can be used to blog or journal about issues, ideas relevant to your practice or online identity
Example:Page based journaling/blogging with posts
- Endless possibilities
Add New Post
- From the Dashboard, click Posts on the left-hand menu bar.
- Click the Add New button (see Figure 2 image at right).
- Enter a new short title in the New Post such as “A Teaching Challenge” and enter text in the large empty box below the title.
- In the Categories area on the far right, enter a category name and click Add New Category button.
- In the Post Tags area on the far right, type a new tag (eg. learning, students, education, etc) and click Add button.
- Browse the Discussions settings below and either allow or disallow comments on your posting.
- On the far right, in the Publish settings, click Preview to see your new post, and then click Publish. Note: the yellow confirmation at the top of the page.
- Create a second post following the above directions.
- At the top of your Post, click View Post
Both your new posts will now appear on the front page of your webspace.
Changing Your Front Page
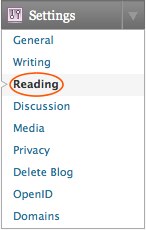
The Reading Settings control how a webspace is displayed to visitors. Front page displays allows you to choose what appears on the blog’s front: the latest posts or a static page that you have created in the Pages section of your blog. (see Figure 6 image at right)
Hands-on Activity - Creating posts for your ePortfolio
- Consider how you might use the posting feature of WordPress and develop two posts for your ePortfolio:
- Add content to each post
- Format the content using the kitchen sink.
- Consider categories and tags
Customizing your ePortfolio
Wordpress Themes
WordPress Themes can provide control over the look and presentation of the material on your webspace. Changing your WordPress Theme does not impact the content of your site only the header image and widgets.
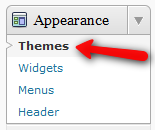
- From the Dashboard, under the Appearance drop-down menu, click Themes (see Figure 7 image at right).
- Manage Themes screen appears, displaying your current theme. Browse through the many different themes and select one by clicking on the thumbnail image.
- Wordpress displays a quick view of the selected theme.
- Click Activate at the top right of the screen. Visit your site to see the changes!
Customizing Headers
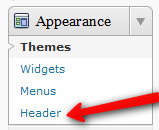
- From the Dashboard, under the Appearance drop-down menu, click Header. (see Figure 8 image at right)
- Click on Choose File, select an image (jpg, gif, png) from your computer and click Upload.
- Adjust the header image with the slide ruler and click Crop Header.
- Click Visit Site and see what your webspace looks like now!
Widgets
A Sidebar “Widget” is just a silly word that WordPress has chosen to describe the sidebars on your webspace. Widgets are things you can add to your webspace to make it more interesting, such as a calendar, links to your favorite websites, a search feature, a tag cloud, and so much more!
Adding Widgets
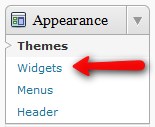
- From the Dashboard, under Appearance, click Widgets. (see Figure 11A image at right)
- Select the desired widget(s) and click on it.
- Drag the widget to the sidebar and drop it where you would like it to appear.
- Enter a Title, select a Position, and click Save Widget.
- Open each widget and edit the title and content and click Save.
- Click the Visit Site button at the top of your screen to see the new sidebar on your webspace.
Privacy and sharing
- When developing a teaching ePortfolio it is useful to consider the following questions:
- Who will see my ePortfolio?
- How dynamic/interactive would I like this webspace to be?
Privacy settings
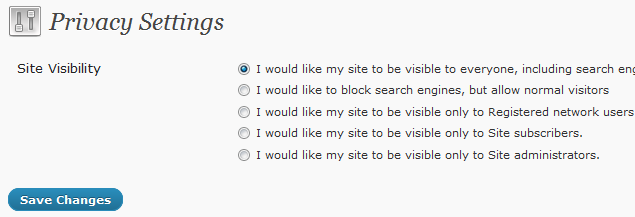
The Privacy Settings control your webspace visibility to search engines like Google. You can decide if you would like your blog to be visible to everyone, including search engines or not. If you don't want your blog available to the search engines you can block search engines, but allow normal visitors to see your site.
- From the Dashboard, under the Settings drop-down menu, click Privacy.
- Browse through the Site Visibility settings and select the most appropriate settings for your webspace.
- Click Save Changes. (Note: If you have selected “I would like my blog to be visible only to registered members of the blog”, refer to Adding Specific Users section below)
Blog Visibility has 5 options - the top three of importance are:
- I would like my blog to be visible to everyone, including search engines (like Google, Bing, Technorati (Technorati is an Internet search engine for searching blogs) and archivers – This is the setting used by most blogs. It lets everyone read your blog and allows your blog to be included in search engines and other content sites.
- I would like to block search engines, but allow normal visitors – If you want all human visitors to be able to read your blog, but want to block web crawlers for search engines, this is the setting for you.
- I would like my site to be visible only to Registered network users – You would use this setting to create a private blog. If selected, another area will appear where you can control which WordPress.com users will be able to log into your blog to read it (those users will only be able to read your blog, they will not get access to your dashboard to edit your blog, please see this section if you want to give people edit access):
Resources
Teaching Portfolio CoP Webspace
WordPress Documentation
CTLT Teaching Portfolio Resource

