Documentation:Kaltura/Create a Clip (How To)
Kaltura provides tools that enable you to shorten a clip or highlight specific parts of videos you have uploaded. This allows you to quickly cut a long clip for class use, without the need for video-editing software or re-uploading the media again.
This document will show you how to:
- Set specific start and end points using the various methods provided by Kaltura's Clipping Tool.
- Preview the newly created clip.
- Save your work and publish it to the class.
- Complete metadata following the UBC Metadata guidelines.
Video
EffectivePractices
- Due to limitations of the tool, there can only be one clip per video made at one time. Plan ahead accordingly.
- Use the tool to create relevant clips even if those clips are several years out of date (you can clip out a portion that contains the date, for example)
- Shorten a clip to create highlights and to reuse specific parts for other areas of the course.
- Since the Clipping tool is non-destructive, that is, it leaves the original clip intact, there is no need to create additional backups prior to clipping as Kaltura retains the original video as a backup.
Clipping your video from My Media
- Begin by starting in My Media.
- Note: While you can start in Course Gallery, for the purposes of this tool, we will continue the documentation in My Media. See the section Clipping in Course Gallery for more information.
- Select the video you would like to clip.
- Click the Create Clip button, below the video preview.
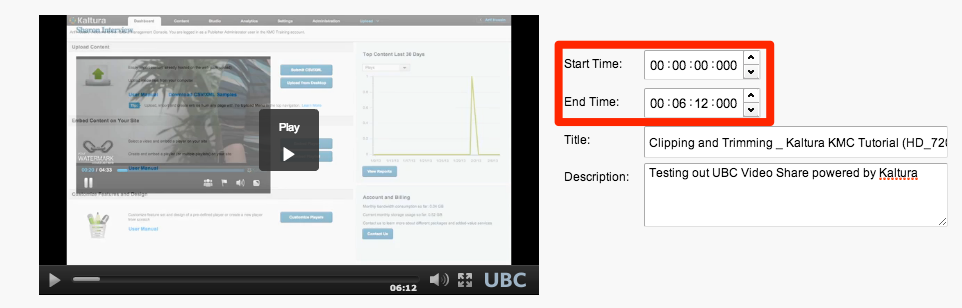
This is the Clip Editor window where you can clip a video in several ways as well as modify its description and title.
Clip using time stamps
- On the right of the clip preview, begin by entering the start time you want the video to start at. The format is hours:minutes:seconds:milliseconds.
- Enter the end time, using the same format.
- Make changes to the title and description here as well.
- Click save to create the clip.
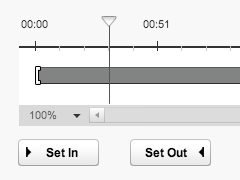
Clip using time bar
At the bottom of the clip preview, there is a bar marked with the length of the video. As you scrub the bars left and right to shorten or lengthen the clip, the preview window will show what is playing at that point in the video. This makes it incredibly easy to find the exact position of where you would like to clip the video.
Click and hold the left bracket ([) to set the start time. Similarly, set the end time by clicking and holding on the right bracket (]).

Clip using the Set In and Set Out Buttons
You can set the start and end points directly from the video itself. When you are watching the video and wish to select the point in the video to be your start or end point, pause the video and click either the Set In to set the beginning of the video or Set Out button to set the end.
When you are finished, click Save to create the clip.
Previewing the new clip
After you have made the necessary edits, you can preview your shortened clip by pressing the preview button (![]() ) on the bottom right corner. Pressing this button will start the video from the point where the grey bar begins and stops when the grey bar ends.
) on the bottom right corner. Pressing this button will start the video from the point where the grey bar begins and stops when the grey bar ends.
Other Functionality
Enable others to create clips with your media
Check the box Allow others to make clips of this video in the video information area. This enables other course participants to make non-destructive clips of your videos.

Clipping in Course Gallery
In the Course Gallery, you can clip videos owned by other course participants who have allowed clipping, which employs similar buttons and methods as described in this resource.
Multiple Owners
After contributing a video to a Course Gallery or Faculty Repository and allowing other users to make clips, users that choose to make a new clip from the contributed video will own that clip. That is, the newly clipped video will appear in their My Media section of Connect as well. The original contributed video will not be deleted or altered after the clip, and should the original owner choose to deleted the originally contributed video, the clipped video(s) that users have created will be retained in their My Media.
Example Workflow:
User 1: Goes to “My Media”, selects the video and checks the box “Allow others to make clips of this video”. Then clicks “contribute to Faculty Repository”, assigns the video to one or more categories and clicks OK.
User 2: Goes to “Faculty Repository”, selects the video and clicks “Add to a Course Gallery”, selects the desired course from the drop-down menu and clicks ok. Then clicks Courses on the top menu, under Course List, enters the course to which the video has been added. Finally, under Course Media, clicks on ‘More’, selects the video, clicks “Create Clip”, changes the title/description if desired and clicks Save. The video will be saved in User 2’s My Media.
Metadata Guidelines
When uploading media onto Kaltura, naming methods may vary on the files themselves. UBC recommends following these following guidelines to assist human readability, provide consistency across videos on Connect, and help make videos easier to locate through tagging.
Titles
- Use sentence case – only uppercase the first letter of the title, proper names (people, places) and acronyms.
- Drop initial articles like “A” and “The”.
- Separate a sub-title from the title proper with a colon (:)
Tags
- If possible save this tag for subject keywords only
- Separate the words or phrases with a comma.
Description
- Include items such as the date or the affiliation of the video creator/uploader.
- This may also be used for an abstract or brief summary of a resource, a table of contents, etc. It can also been used to record notes about the resource.