Documentation:CTLT Computer Backup Guide
Computer Backup Guide
There are two steps to backing up your computer, the first is to access Home Drive, and the second is to set up a backup service to back files up to Home Drive. On MAC, the instructions below indicate how to use Carbon Copy Cloner (Time Machine is not compatible with Home Drive), while on Windows, the instructions below explain how to use Backup and Restore. These services are free and any CTLT staff member with access to Home Drive can take advantage and setup a daily backup of all of their important files.
Accessing Home Drive
Mac
- Please refer to the guide provided by UBC IT:
http://it.ubc.ca/service_catalogue/servers_storage/home-drive-storage-service/setup/macos
- If you have any problems accessing Home Drive, please contact ctlt.itsupport@ubc.ca
Windows
- For Windows 7 or Windows Vista, please see the guide provided by UBC IT:
http://it.ubc.ca/service_catalogue/servers_storage/home-drive-storage-service/setup/windows
- For Windows XP, please see the guide provided by UBC IT:
http://it.ubc.ca/service_catalogue/servers_storage/home-drive-storage-service/setup/winxp
- If you have any problems accessing Home Drive, please contact ctlt.itsupport@ubc.ca
Backing Up Files to Home Drive
- Organize your files, preferably into one folder, so that it is easy to designate which folder(s) will be backed up to Home Drive
- Ensure that the guidelines for appropriate use of home drive are being followed, as detailed by UBC IT:
http://it.ubc.ca/service_catalogue/servers_storage/homedrive/description
Mac
- Time Machine will not work for backing files up to Home Drive
- On the MAC, download and install a free copy of Carbon Copy Cloner from http://www.bombich.com/
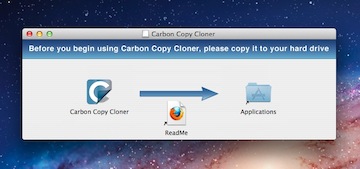
- When the dmg file has finished downloading, double click on it to begin the installation process. When the window pops up, drag the "Carbon Copy Cloner" application folder into "Applications" to complete the installation, as shown in the screenshot below:
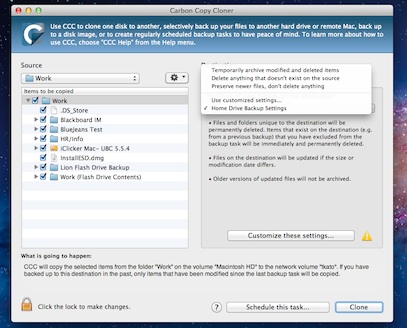
- Open Carbon Copy Cloner
- Select the source folder to be backed up to Home Drive
- Select Home Drive as the destination folder for the backup
- Select "Customize these settings..."
- Name the settings "Home Drive Backup Settings"
- Set that files and folders that are present on the destination should be "Deleted immediately"
- Make sure that "Protect root-level items on the destination" is not checked
- Set files that have been modified since the last backup should be "Overwritten"
- Make sure that "Don't modify files that are newer on the destination" is not checked
- Click "Ok"
- Click "Schedule this task..."
- Click "Continue"
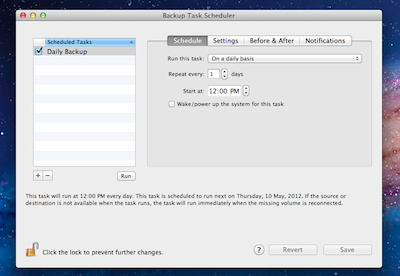
- Open the "Schedule" tab
- Rename "untitled" to "Daily Backup" in the left-hand pain
- Select run this task "On a daily basis"
- Select repeat every "1" days
- Select start at: "12:00 PM" or other desired time
- This will make your computer perform a scheduled backup at the time selected once per day
- If your computer is off at the scheduled backup time then it will be backed up the next time it is turned on instead
- Make sure "Wake/power up the system for this task" is not checked
- Click "Save"
- Enter your computer administrator username and password
- Your Mac will now back up the chosen files to Home Drive each day at 12 PM
- Home Drive will keep the previous 30 days worth of backups
- The first backup will take significantly longer than subsequent backups however you can continue to use your computer while the backup is running
- Later backups will be quick because only new or modified files need to be backed up, unchanged files are left the same
- Don't cancel backups partway through
Windows 7
- Open "Control Panel" from the Start Menu
- Open "Backup and Restore"
- Click "Set Up Backup"
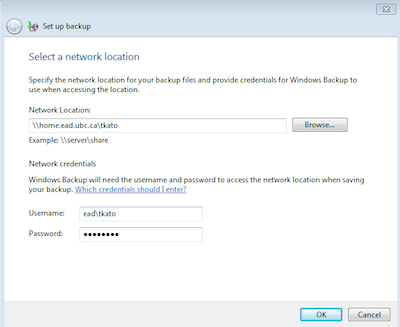
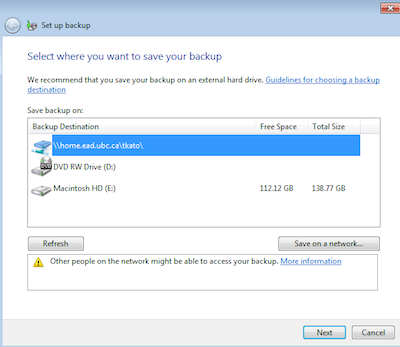
- Click "Save on a Network"
- Enter your homedrive network address: \\home.ead.ubc.ca\<cwl username>
- Enter ead\<cwl username> as your username
- Enter your CWL password
- Select your Home Drive as the backup location
- Click "Next"
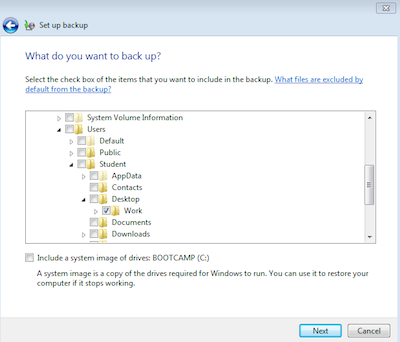
- Select "Let me choose"
- Click "Next"
- Uncheck all files it sets to be backed up by default
- Navigate to Users->Student->Desktop
- Check off all folders that you desire to be backed up
- Uncheck "Include a system image of drives..."
- Click "Next"
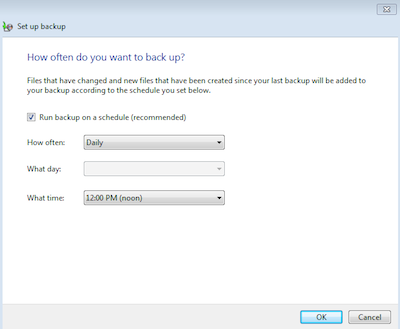
- Click "Change Schedule"
- Make sure "Run backup on a schedule" is checked
- Set How often as "Daily"
- Set What time as "12:00 PM"
- Click "Ok"
- Click "Save settings and run backup"
Windows Vista
Please see CTLT Internal IT for assistance
Windows XP
Please see CTLT Internal IT for assistance
