Documentation:WordPress Basics/Basics 1 Guide
Workshop Overview
WordPress and open blogging platforms in general have been increasingly adopted in teaching and learning in Higher Education. UBC Blogs has over 10,000 active blogs used by Faculty, Staff and Students as community sites, course blogs and for personal reflection and publication. Join us for an interactive and hands-on exploration of the WordPress platform in teaching and learning. Explore examples of how WordPress has been used for teaching and learning at UBC including: a classroom backchannel, a way to engage and sustain communities, a reflective space for learning and assessment, a course blog where students can share media, interact and discuss course topics and materials, an open space where students can engage with an interact with a global audience on the Web.
The session will include a hands-on-component that will introduce you to the overall set up of a WordPress site and provide you with the tools needed to go further. This is an introductory workshop open to anyone with an interest in the WordPress/UBC Blogs platform or interested in the role of open and social media in the classroom in general.
Before you come to the session, you should sign-up for a UBC Blogs account and create your first blog.
Training Guide: http://wiki.ubc.ca/Documentation:WordPress_Basics/Basics_1_Guide
Workshop Agenda (5 mins.)
- Introduction: You, Us
- lucas.wright@ubc.ca - Learning Technology Specialist, CTLT
- zack.lee@ubc.ca - Educational Resources Developer, CTLT
- Session Objectives
- Participants will:
- Create and add content to their own webspace
- Organize their site according to their goals and audience needs
- Participants will:
Agenda
- Burning Questions: What burning questions do you have about WordPress that you would like to learn the answer to during this session.
- Activity I: Defining the Purpose of Your Site
- Activity II: Hands-on WP
- Wrap-up, Questions
- Where to get support
- Copyright
- Feedback
Introduction: WordPress and UBC (10 mins.)
WordPress at UBC
A WordPress webspace is made up of basic elements: pages, posts, categories, and tags. Understanding the difference between a page and a post is core to understanding WordPress. A page and a post are both a collection of paragraphs and look almost identical. Pages form the basic information about a site, such as “About the Author” or “Contact Information.”
A page is on a topic and there is one page on that topic. A user views pages one at a time. A post is like a collection of pages. A post belongs to a category. A site has multiple posts about each category. In my site, I have a category called “Articles.” As I post an article, I categorize it under Articles. This enables a viewer to see my articles by clicking on the category “Articles.” A user can view a single or multiple posts at a time. A post is time sensitive, reflecting when it was written with the most recent shown first. The more website-like a blog is, the more posts it will have. Pages are website-like, posts are blog-like.
UBC's WordPress Service

Examples
UBC Examples
Currently, UBC is using weblogs:
- as personal logs/journals to keep track of work/learning activities
- as digital photo albums
- as potential e-portfolio tools
- as course web pages, encouraging discussion and collaboration
- as private management and communication tools for large campus groups, administrative teams, and communities of practice
- to easily update online newsletters
- to keep a collection of useful, searchable links
- as a social networking site
Visit some of these examples:
Student and Faculty Blogs at UBC-V:
Professional/Informational:
- Dean Giustini, Biomedical Librarian, UBC Biomedical Branch Library (http://blogs.ubc.ca/dean/)
- Julian Dierkes, Assistant Professor, Institute of Asian Research (http://blogs.ubc.ca/jukupedia/)
Portfolio:
- Roselynn Verwoord, Evaluation and Research Coordinator, CTLT (http://blogs.ubc.ca/etec565rverwoor/)
- Joanne Fox, Instructor, Advanced Molecular Biology Laboratory (http://www.joannealisonfox.com/blog/)
Student Directed Seminars:
- ASTU 400B: Books on Trial – Modernism, Aesthetics, and Obscenity (http://blogs.ubc.ca/booksontrial/)
- ASTU 400: United Nations & Diplomacy (http://blogs.ubc.ca/astu400e2010/)
- ASTU 400D: Perspectives on Peace: An Examination of Post-Conflict Societies (http://blogs.ubc.ca/sdspostconflict/)
- ASTU 400D: Science Fiction and the City (http://blogs.ubc.ca/sciencefictionandthecity/)
Courses:
- ETEC 522: Ventures in Learning Technologies (http://blogs.ubc.ca/etec522sept11/)
- ENGL 112: Strategies for University Writing (http://blogs.ubc.ca/english112/)
- PHAR 330: Genomics and Personalized Medicine (http://blogs.ubc.ca/phar330/)
- PSYC 320: Psychology of Gender (http://blogs.ubc.ca/ubcpsycgender/)
- SCIE 300: Communicating Science (http://blogs.ubc.ca/communicatingscience2010W200/)
Sites:
- Learning Commons (http://learningcommons.ubc.ca/)
- This Changed My Practice (http://thischangedmypractice.com/)
Worldwide Examples of Wordpress sites
- Speakeasy - Wall Street Journal (http://blogs.wsj.com/speakeasy/)
- University of Mary Washington (http://www.umw.edu/)
- New York Times Blogs (http://www.nytimes.com/interactive/blogs/directory.html)
- City University of New York Academic Commons (http://commons.gc.cuny.edu/)
Hands-On
Sign-up and Login
UBC Blogs is integrated with the Campus-Wide Login (CWL) system. You don't need to create a new ID, just sign-up with your CWL. This also means that UBC Blogs is available to any member of the UBC community.
Get a UBC Blogs Account
- Go to https://blogs.ubc.ca/ (bookmark this for the future!) >> click on the LOGIN button and enter your CWL information.
- The “Get your own UBC Blogs account” screen appears
- Enter a Username (only the lowercase letters a-z and numbers allowed), Email address, and Display Name
- Agree to to the terms: "I have read and agree to the terms of service"
- Select "Gimme a Site" and click the NEXT button

Create a Blog
- Choose a Site Name and Site Title.
- Note: The Site Name will become part of your URL and cannot be changed.
- Select the Privacy option you are comfortable with
- Click the SIGNUP button at the bottom of the page

A Tour of the WordPress Dashboard
The Dashboard is the "nerve" centre of your blog spaces. This is where you can create posts and pages, upload files, manage comments, and change the settings of your blog. Familiarize yourself with the Dashboard as you will be spending lots of time on it.
Accessing Your Dashboard
Accessing your blog's dashboard is very easy:
- If you're not logged in, login with your CWL
- Hover over My Blogs on the top toolbar
- Move your cursor to your blog
- Click on Dashboard

WordPress Dashboard
Some important areas are:
- My Sites - lists the blogs you have access and Create a New Site feature
- Visit your webspace by clicking on the underlined title
- Right Now column gives a quick snapshot of how many pages, posts, categories and tags exist

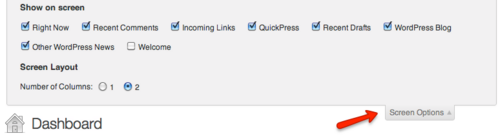
Screen Options Menu
Found on the top-right corner of your screen, the Screen Options menu allows you to customize the look and feel of your dashboard.
It controls the visibility of certain areas (e.g. Right Now and Recent Comments in the Dashboard Home) or the visibility of information in certain pages (e.g. the Author or Date column in the Media Library).
Check the Screen Options menu first if you cannot find a particular item in your the Dashboard.
Pages & Posts
WordPress employs two fundamental content types: pages and posts. These content types behave quite differently and therefore it is important to understand when to create a page or a post.
Pages are static. They are a good way to publish information that doesn’t change much, like an "About" or "Contact Us" page. Pages are usually linked from the main navigation bar on the Homepage.
Posts are dynamic. Posts are always associated with a date and are meant to update your audience.
Some key differences:
- Posts are:
- dynamic (you may create a couple of Posts a day!)
- displayed in reverse chronological order (placing the most recent content at the top of the page)
- can be assigned tags and categories (helps with search engines!)
- meant for updating your audience
- syndicated via RSS
- Pages are:
- static content that will not change - or very, rarely anyways (Examples are 'About Me', 'Contact Me', 'Services', etc.)
- not related to categories or tags
- do not appear in RSS feeds
- may have sub-pages (this gives the appearance of a more traditional website)
Add New Post
Posts are designed for more dynamic content such as news and updates.
- From the Dashboard, click Posts on the left-hand menu bar
- Click the Add New button
- Enter a new short title in the New Post and enter text in the text box below
- On the far right, in the Publish settings, click Preview to see if everything looks fine
- Click Publish (Note: the yellow confirmation at the top of the page)
- At the top of your Post, click View Post

Categories and Tags
Categories and tags are indexing systems for your site. Categories are typically used to index your posts often using general taxonomies. Tags are typically more granular than categories and are often used to link to keywords or details within a posts.
Creating and linking a post to a category
- While writing or editing a post, under the Categories section on the right-hand sidebar, click Add New Category
- Enter the category in the form that appears and click Add
- Once you have published your posts it will be linked to this category.
Linking a Tag to your Post
- From the post form enter tag(s) separated by commas. Click Add to add the tag to your post

Creating Pages
Pages are used for static information in WordPress. To access all of your site's pages click on All Pages. From this list you can edit and delete any of your pages. The following steps will guide you through adding pages to your site.
- On the left-hand menu bar, under Pages, click Add New
- The Add New Page screen appears. Give the page a title and enter text in the text box
- Click the Kitchen Sink icon to expand the toolbar and format the text
- Click Publish

Changing Your Front Page
The Reading Settings control how a webspace is displayed to visitors. Front page displays allows you to choose what appears on the blog’s front: the latest posts or a static page that you have created in the Pages section of your blog.

Adding Media to Pages and Posts
A number of different media formats can be uploaded to WordPress MU including PDFs, Docs, PPTs, and images. This media can be inserted into pages and posts in your site. The following guide will assist you in adding content to your site.
- Create a new page by clicking on Pages in the sidebar
- To add media to a page, scroll to the area above the Formatting Menu and select the Add Media icon
- From the Add Media Window, drag and drop files from your desktop or click on Select Files
- Choose the image, document or audio file to upload and click Open
- Once the upload is complete, give the media a title, a caption and description (optional), alternative text (accessibility) and click Insert Into Post. If the file is an image it will appear in their post. If the file is a PowerPoint, PDF or Document it will appear as a hyperlink
- Click Update on the right-hand sidebar to publish your revised page
- Click on View Page to return to the site and view the changes

Embedding Content from External Sites
The Web is full of rich and diverse content such as photos, videos and music. One of the primary characteristics of the modern web is the ability to easily share media with others. Sharing can be facilitated by embedding or placing resources such as photos and videos into your pages or blog posts.
Look out for the </Embed> or Grab Code links or buttons on websites such as Flickr or YouTube. You only need to copy the HTML code they provide and paste into a post or page while in HTML View.
Copyright
When using content shared online, everyone is required to be aware and respectful of the original creator's copyright. Some works are available for reuse such as those licensed Creative Commons while others are not. The following are some best practices and resources when it comes to copyright:
- Best Practices
- Ask permission from the creator, include where you are from and what you are using the content for.
- Search for works with open licenses such as Creative Commons or Public Domain
- Attribute the work to the original creator
- Provide a link or link back to the original source
- Resources
- copyright.ubc.ca
- Flickr Creative Commons - for images
- Archive.org - open licensed Content, Video, Audio, Images, Text
- Google Advanced Search - filter searches by usage rights
- Wikimedia Commons - repository of educational media
- Creative Commons Search
For a more comprehensive list of ways to find open resources (e.g. audio, video, images, artwork), see Find OER by Paul Stacey, Director of Creative Commons Canada
Widgets

WordPress Widgets are designed to provide a simple way to add various elements to your sidebar or footer without changing any code. They can help visitors easily navigate through your site or find the specific information they need.
Take note though that widget areas are theme dependent. Not all themes will have the same places to put widgets in.
Widgets Section

The Widget Section contains three important elements:
- Available Widgets
- This box contains all the available widgets you can use for your blog.
- Widget Areas
- Depending on your blog's theme, you can have different areas to add widgets to. Some areas are for your left sidebar or the right sidebar. There are also themes that allow you to add widgets to your blog's footer.
- Inactive Widgets
- You can archive widgets you have used by placing them in this box. All the widgets placed here will retain all their settings, ready to be used if you choose to do so.
- When you change themes, all of your widgets will not be transferred automatically but placed in the Inactive Widgets area.
How to Add Widgets
You can add widgets by simply dragging a widget from the Available Widgets box and dropping them into any of the Widget Areas.
How to Remove Widgets
Remove widgets by dragging them outside of the Widget Areas or dropping them into the Inactive Widgets box.
You can add widgets that will help visitors navigate around your site. Depending on how your structured your content, you have a number of options at your disposal.
- Tag Cloud Widget: Creates a text cloud based on the tags you have used on your posts. The more a tag is used, the larger it will appear in the tag cloud.
- Categories Widget: Create a list based on how you categorized your posts. You can also create drop-down menus by using subcategories.
- Pages Widget: Creates a list based on the pages you have created.


Text Widget

The Text Widget provides you added flexibility with an area to add custom text, images, or any other media onto your sidebar. Some knowledge of HTML is needed for more advanced and customized uses.
If you don't know HTML, try creating your content as a post and then copying the code in HTML View.
Take note that space for the sidebar area is limited. You may need to adjust or experiment a few times to get the sizing correctly.
Examples
Changing the Look of Your WebSpace
Wordpress Themes
WordPress Themes can provide control over the look and presentation of the material on your webspace. Changing your WordPress Theme does not impact the content of your site only the look and feel (e.g. header image, widgets).
- From the Dashboard, under the Appearance drop-down menu, click Themes.
- Manage Themes screen appears, displaying your current theme together with the different customization options.
- Browse through the many different themes.
- Click either the theme thumbnail or Live Preview'
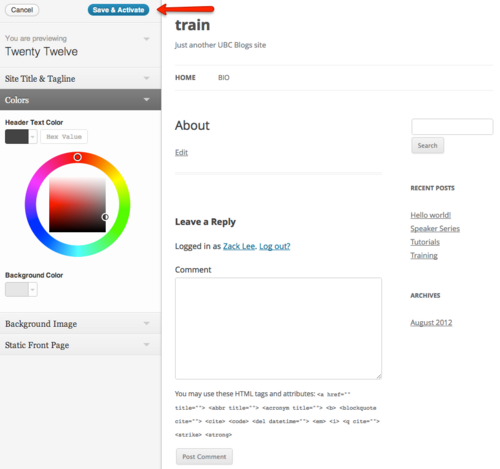
- In the Live Preview page, you can customize your site using the different options on the left-hand sidebar.
- Note: Options in Live Preview are dependent on the theme's features. Feel free to experiment as this will not appear on your site until you click Save & Activate at the top-left corner of the page.
- Click Save & Activate at the top-left corner of the screen and visit your site.

Customizing Headers
Some themes enable you to add customizable headers for greater personalization of your webspace. Remember that all themes are different; some might not even have headers.
- From the Dashboard, under the Appearance drop-down menu, click Header
- Click on Choose File, select an image (jpg, gif, png) from your computer and click Upload
- Adjust the slide ruler to crop the header image
- Click Crop and Publish
- Click Visit Your Site on the yellow notification at the top of your screen

Privacy Settings
The privacy settings control your site's visibility. You can decide if you would like your blog to be visible to everyone, including search engines. If you don't want your blog available to search engines you can block them, but allow normal visitors to see your site.
- From the Dashboard, under the Settings drop-down menu, click Reading.
- Browse through the Site Visibility settings at the bottom of the page and select the most appropriate settings for your webspace.
- Click Save Changes. (Note: If you have selected “I would like my blog to be visible only to registered members of the blog”, refer to Adding Specific Users section below)

Blog Visibility has 5 options, which goes from most open to most private:
- Allow search engines to index this site.
- This is the setting used by most blogs. It lets everyone read your blog and allows your blog to be included in search engines and other content sites.
- Ask search engines not to index this site.
- The site will be accessible to everybody but will not be searchable through search engines.
- I would like my site to be visible only to Registered network users.
- Only those with a CWL and a UBC Blogs account will be able to visit your site.
- I would like my site to be visible only to Site subscribers.
- Only people that are added to your blog as a user will be able to access the site.
- I would like my site to be visible only to Site administrators.
- Only you and other users with site administrator roles will be able to access the site.
Depending on your level of comfort, content type and target audience, different privacy levels will suite you in different contexts. The following are some of the most common examples:
- Sites in development are usually only visible to site administrators in the beginning.
- Course blogs that are restricted to only class participants are only visible to site subscribers.
- Community sites with content intended for visitors outside of the UBC community will allow search engines to index their site.
Adding Users
The WordPress Users feature is designed to give the blog owner the ability to control and assign what users can and cannot do in the blog. A blog owner must manage and allow access to such functions as writing and editing Posts, creating Pages, defining Links, creating Categories, moderating Comments, managing Plugins, managing Themes, and managing other users. You can add as many administrators, subscribers, editors, authors, and contributors to your blog as your like.
- From the Dashboard, click the drop-down menu on Users and select Add User
- Enter an Email, select a Role from the drop-down menu, and click Add User
- The user you have added will appear in the invitation box below

Creating Another Blog
You have the option of creating a second (even third!) webspace for yourself/department/faculty.
- From the My Blogs drop down menu at the top of the screen, click Create a Blog.
- The "Get another UBC Blogs site in seconds"" appears. Complete the required fields and click the Create Site button at the bottom of the page.

Support & Drop-ins
Email: [1]
Need help with blogs or cms?
Visit us at the WordPress Clinics:
- When: 1:00PM - 3:00PM, Thursday
- Where: Center for Teaching, Learning and Technology, Irving K Barber Learning Centre
You can sign-up for the clinics at: events.ctlt.ubc.ca
Resources
License
|
|