Documentation:Toolkit for the Digitization of First Nations Knowledge/SECTION D: Audio Digitization/D1: Audio Cassette Tape/D1.3 Digitization Guide - Audio Cassette Project Parameters
Overview
This guide is a step by step manual which should enable the reader to digitize an audio cassette tape. Before employing this guide project parameters should have already been established and workflow processes should have been completed. Additionally, training should have been provided for the person performing digitization. Please see the Preparing for Digitization section below for details.
Preparing for Digitization
Prior to digitization please ensure that the following parameters have been established for the project:
- All media assigned a unique identifier.
- Digitization selection criteria such as the order for digitization of tapes.
- Secure, temporary storage of tapes
- Naming convention for Preservation files (what digital audio files will be named.)
- Digital Storage for working, and preservation should be purchased and on hand.
- Folder structure for digitized files (where files will be stored at various parts of the process.)
- The bitrate and bit-depth used in digitizing for preservation is determined
- Tracking process confirmed (e.g. paper forms, spreadsheet, etc.)
- Workflow for when documentation and quality monitoring need to occur
- Field list and data structure for media tracking spreadsheet or other tracking tool
- Policy regarding what “editing” of the audio capture is permissible prior to saving the Preservation Master audio file.
Training
Skills to be acquired prior to digitization.
- Care and handling of magnetic media.
- Cassette player head and tape path cleaning
- Computer competency
- Working knowledge of audio recording terminology
- Understanding of documentation needs and required workflow
Before Digitization
NOTE: Ensure that work environment is clean and clear of devices which could cause electromagnetic interference (i.e. cellular telephones).
Digitizing the Audio tape (Creating Digital Preservation Master files of your audio)
Step 1. Collect resources needed for digitization session
Collect and review the following items for digitization of current cassette:
- 1. Cassette tape
- 2. Completed condition assessment form for the cassette tape
- 3. New digitization log form Appendix D1.3
Step 2. Start Digitization Log
Record tracking information on Digitization Log
- 1. Tape identification number
- 2. Name of digitization technician
- 3. Current date
- 4. Verify encoding type – check box
Step 3. Examine tape and player
Ensure that all resources are ready for digitization process.
- 1. Visually compare cassette tape and its Condition Assessment report to ensure accuracy of the condition assessment. Check off completion of this comparison on the Digitization Log and document any discrepancies in the notes box. If there is material difference between the information in the Condition Assessment and the physical tape then abort the digitization process and flag the tape to have another condition assessment performed.
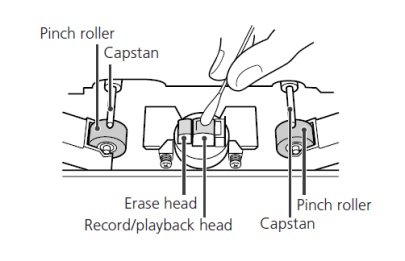
- 2. Use a flash light to closely examine the cassette player tape path. Ensure that it is clean and free from deposits and debris. Metal surfaces and playback head should be shiny and reflective. If any dark deposits are noticed then clean the surface gently with a cotton swab and head cleaner according to the 202mkv manual.
Step 4. Insert cassette into player
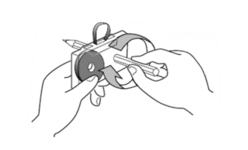
1. Gently turn cassette spindle in to take up any slack in the cassette tape.
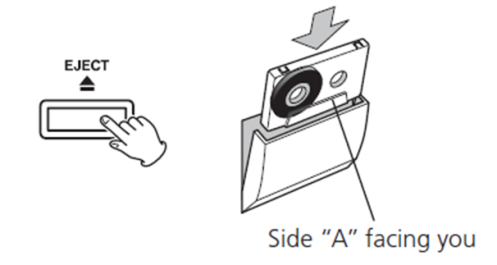
2. Press eject button on left side of cassette player to open the cassette door.
3. Insert tape into the exposed cassette well.
4. Push on the top-right corner of the well door to load the cassette for playback.
Step 5. Determine DOLBY B Noise Reduction setting for cassette playback
1. Examine the condition assessment form to see if labels indicate that Dolby B noise reduction was employed in the original cassette audio recording. If noise reduction is indicated then quickly verify by scanning the cassette case and labels.
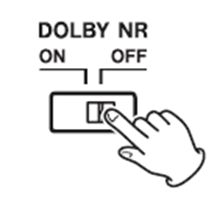
- a. If noise reduction is indicated as having been employed during recording then playback a portion of the cassette recording, while toggling the DOLBY NR switch. If there is an apparent increase in the fidelity of the played signal when the DOLBY switch is ON, then set the DOLBY switch to ON. Switch is located below cassette door 2.
- b. If there is a lowering on tape noise (hiss) but the audio signal sounds like it has lost high frequency response when the DOLBY switch is ON then set the switch to OFF.
2. In all other cases set Dolby B noise reduction to OFF
3. Record setting of DOLBY NR on digitization log.
Step 6. Setup Audacity for audio recording (capture)
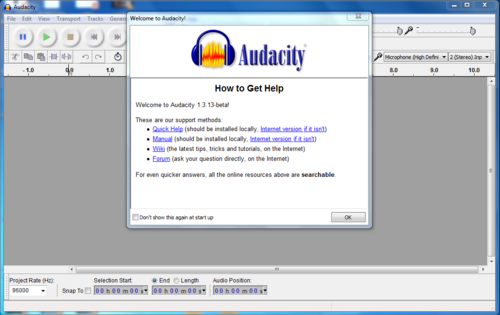
1. Double-click on Audacity icon to run program.
(If Audacity “Welcome Screen” is displayed then click “OK” to close it).
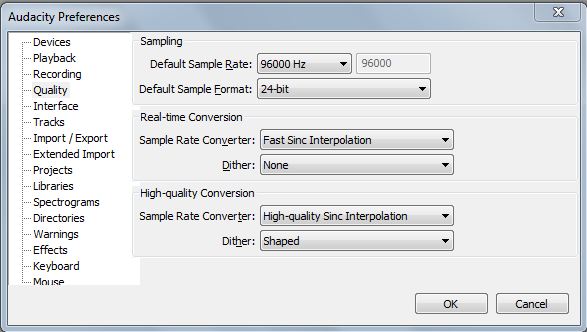
2. Set the sample rate and bit depth of your recording project to Preservation Master quality settings. (Please ensure that all other program preferences are set as outlined in the “Turn on and test digitization system" section of this guide.)
- a. Press Ctrl+P to open the “Preferences” menu.
- b. Click on the menu item “Quality”
- c. In the options under the “Sampling” heading choose:
- i. “Default Sample Rate: 96,000 Hz
- ii. Default Sample Format: 24-bit
- d. Hit “OK” once you are finished changing the settings.
3. Ensure that the input and output are set to Avid Mbox.
Step 7: Determine the output level of the recorded signal on the tape
1. Plug headphones into cassette deck.
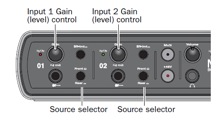
2. Turn the GAIN knobs of the MBOX unit counter clockwise until they are at the lowest setting (to avoid damage to the circuitry of the MBOX)
3. Press the “play forward button” for tape-well #1 (left) on the cassette player.
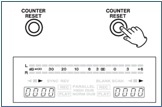
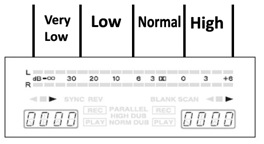
4. Allow tape to play for 60 seconds and watch the “output level meter” on the cassette deck for the highest signal level (Listen through the headphones while you are watching the level meter). When a signal level is observed that exceeds all previous peaks, press “counter reset” to set the counter to zero at each new highest level.
5. Based on the highest signal level observed, assign a “level category” from the following list
- a. None: No signal or faint noise/hiss
- b. Very Low: Signal is apparent but does not exceed 25% on the meter
- c. Low: Highest signal level is between 25% and 50% on the meter.
- d. Normal: Highest signal level is between 50% and 75% on the meter.
- e. High: Highest signal level exceeds 75% of meter.
Step 8. Set the GAIN (amplification) levels on MBOX unit
1. Start monitoring the signal using Audacity by opening the Audacity window and clicking “Start Monitoring.”
2. Rewind the cassette (using the << button) to approximately 10 seconds before the highest signal level was observed.
3. Press play.
4. Immediately press the “REPEAT” button once on the cassette deck. The right-side counter should now read “RE” instead of showing “0000.” Allow tape to play until 0010 is showing on the counter (ten seconds after the highest signal level.)
5. Press “REPEAT” a second time to initiate looping playback of 10 seconds of audio containing the highest observed signal level. The repeat function will only work if you press repeat for the second time after a minimum of ten seconds.
6. Ensure that the MBOX GAIN knobs are in the pulled-out position. Keep them in this position throughout the entire process.
7. Turn the GAIN knobs of the MBOX unit clockwise until the highest signal level registers at about the 75% mark on the Audacity signal monitors. If the signal is already in the 75% (Normal) range, you will still need to set the gain level. You will likely be unable to do so on the first try. However, you should now be listening to the same ten seconds on repeat and will be able to listen to it as many times as needed.
8. Press STOP on the cassette player.
NOTE: If partway through the digitization process the signal level changes drastically, adjust input gains as according to step 8 and restart the digitization process.
Step 9. Capturing the audio signal
1. If you are using headphones, you may now unplug them from the cassette player and plug them into the MBox unit instead. This transfer will allow you to control the volume of the headphones using the MBox.
2. Start a new file in Audacity by clicking File>New.
3. Rewind the tape.
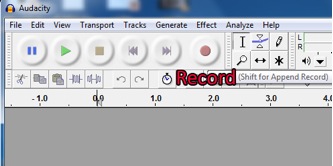
4. Press record in Audacity.
5. Press play on the cassette deck.
6. As the tape is playing, note any mechanical noises in the digitization log including:
- Any abnormal noises (playback unit.)
- Tape binding on guides
- Clicking
- Grinding
- Squealing
Record any incidental noises such as a cough or setting down of a coffee mug that might cause the signal to clip, and note abnormal signal noises including:
- Clicks
- Static
- Change in frequency
- Change in input level
- Clipping
Note existence of transients and general signal quality.
Record any changes in content that occurs during the recording, for example:
- Multiple recording sessions on one tape
7. Allow the tape to play through until the very end, regardless of whether there is an extended silence near the end of the tape or not.
8. Press Stop button in Audacity to end the digital recording after five seconds of silence.
9. In the digitization log, record the duration of the resulting file.
NOTE: The audio file will not be saved until a later step in the digitization process. If Audacity is closed at this point then the captured audio data will be lost. The cassette would then require re-digitization.
Step 10. Remove silence from the recording
NOTE: You may trim off the silence of the recording before saving even if it is the Preservation Master as it will not affect the recorded audio. You should record the duration of silence that was trimmed to preserve the authenticity of the digital audio file. Only trim the file if the silence is at the beginning or ending of the recording. Do not take out silence that is in the middle of a recording as it will affect the authenticity of the digital audio to the original recording.
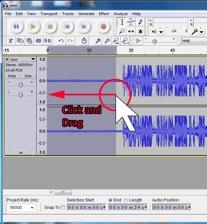
1. Select the portion of silence at the beginning of the audio recording. To highlight, right-click (and hold the button) on the waveform 3-5 seconds before the recorded signal begins, then drag the cursor leftward to the beginning of the audio window. Repeat process to remove silence from the end of the recording, ensuring at least 3-5 seconds of silence remains.
2. Record in the digitization log the duration that you have trimmed off the beginning of the recording, and the final duration of the file. For consistency, record the time removed as: hh:mm:ss
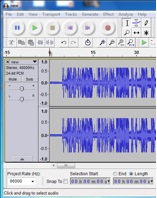
- Ensure that the “selection start” counter reads all zeroes as shown.
- In the second counter selecting “end” or “length” should both display the same value 24 seconds is shown in the example).
3. Hit the “Delete” key on your keyboard to remove the unwanted silence. The resulting audio waveform is shown.
Step 11. Save the file
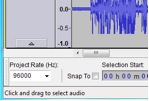
1. Verify that audio data has been sampled at 96,000 Hz by examining the value in the “Project Rate” box in the bottom right of the Audacity window.
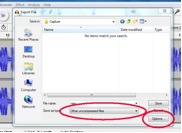
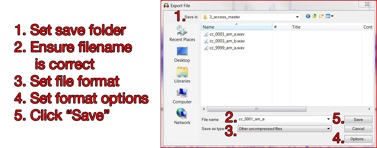
2. Click File>Export File.
3. Select “Other uncompressed files” from the “Save as Type” dropdown menu
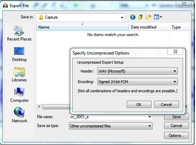
4. Click Options. Select “WAV (Microsoft)” as the Header and “Signed 24 bit PCM” as the encoding.
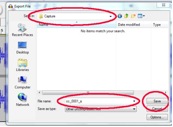
5. Select “capture’ folder of your working drive as your destination for saving.
6. Enter the name of the Preservation Master file to be saved according to the pre-determined naming convention. Only enter the characters of the name and not the wav extension (cc_0001_a is used in the example below)
7. Click the “Save” button.
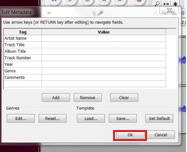
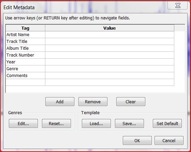
8. A Metadata box will appear; do not insert anything into this box unless instructed to do so by your project manager. Otherwise, close the box and move on to Step 12 to enter your metadata.
9. You may close Audacity. However, when you close Audacity a window will appear asking whether or not you wish to save the file. Unless you wish to save an Audacity project file, click “No.”
Step 12. Apply Embedded Metadata and Save as Broadcast Wave
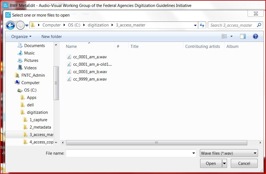
1. Double-click “BWF MetaEdit” icon to start the application.
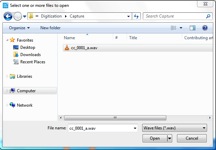
2. Select File>Open File from the menu.
3. Browse to the WAV audio file that was saved from Audacity (cc_0001_a.wav in this example)
4. Click “Open.”
- BWF MetaEdit will open the file and extract technical information from the file into the appropriate metadata field.
- If BWF MetaEdit has been setup as proscribed in the Digitization Startup guide then the application will automatically generate and test a checksum for the audio data within the file. The field MD5Stored field should turn green to signify the successful test of the checksum.
NOTE: If you open a file that already has a checksum embedded then BWF MetaEdit will automatically test the previously generated checksum against the audio data. If the MD5Stored field turns green in this case then there has been no corruption of the audio data since the checksum was made.
5. Click on the “Core” button on the left pane of BWF MetaEdit to change views to “Core” metadata.
6. Double-click in the “Originator” field to open a text entry box.
- Enter the name of your organization and click “OK”
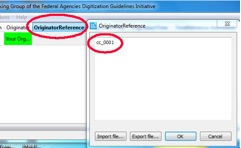
Double-click in the “OriginatorReference” field and enter the unique Object ID of the cassette tape that is represented by the open audio file (cc_0001_a in this example).
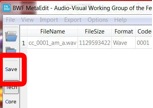
8. Click on the “Save” button on the left pane in order to convert the file to Broadcast Wave and embed the appropriate metadata.
9. Copy the resulting file to the “Preservation/Master/” folder on your onsite Archival Master Storage drive.
Create Access Master Files
Step 1. Open the file in Audacity
a. Double-click on the Audacity program icon. Wait for Audacity to fully load. Click “OK” to dismiss “Welcome to Audacity screen if it pops up.
b. Click on the “File” tab and then select “Open” (or click Ctrl+O.)
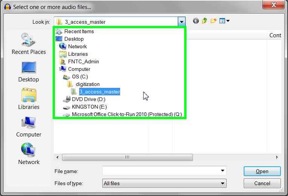
c. Browse to the current audio file. Click on it to select it and then click on the “Open” button to open it.
At this point Audacity will present a warning prompt, asking whether to “Make a copy of the file…” or to “Read the file directly…” Select “Read the file directly…” and press OK. The file should open and the waveform of the audio should display in the Audacity editing window.
Step 2. Adjust your viewing window to best see the waveform
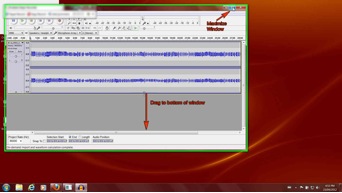
a. Maximize the Audacity application window (if not already maximized).
b. Left click and hold the bottom of the audio file window (cursor becomes vertical line with arrows at top and bottom). Drag the bottom edge of the window downward to the bottom of the Audacity program window.
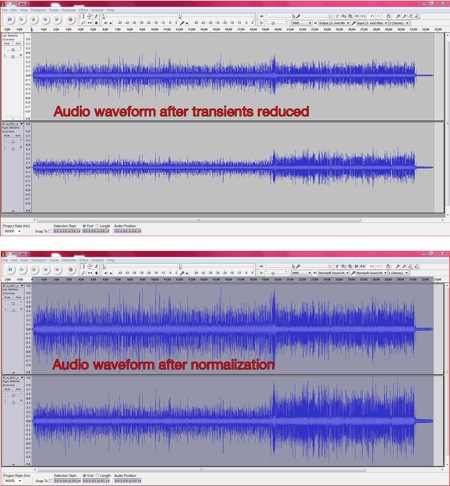
Step 3. Reduce the level of high transient noises if necessary and efficient
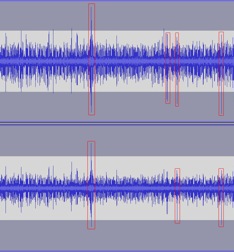
a. Visually scan the waveform looking for very tall, very thin peaks.
b. If there are many (more than ten) of these peaks then it will not be time efficient to manually decrease their levels. Go to Step 5 below.
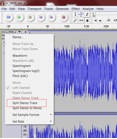
c. Click on the small triangle beside the audio filename to open the drop drown menu for that track. Select “Split stereo track”.
NOTE: This option sets Audacity to edit the tracks separately so that peaks can be reduced without affecting the audio levels of the other track.
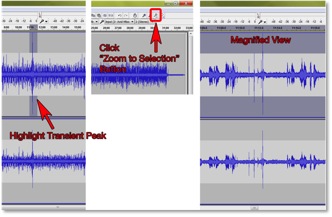
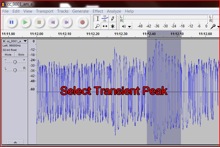
d. Roughly highlight the first transient peak that you want to reduce.
e. Click on the “Zoom to selection” button on the toolbar.
f. Click on the small triangle beside the audio filename to open the drop drown menu for that track. Select “waveform (db)” (not “waveform”).
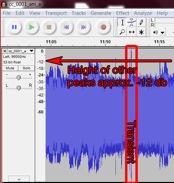
g. Determine level that peaks should be reduced to. Look at the height of the peaks surrounding the transient. Make a note of the corresponding number on the decibel meter to the left. In the example shown below that level would be -12 db.
NOTE: Examining the waveform on the decibel (db) scale is required in order to determine a target db level for transients. Transient peaks are not as pronounced in this view. It may be easier to select the transients if the view is switched back to simple waveform.
h. Highlight the transient peak more accurately (waveform db).
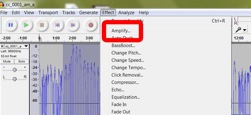
i. Select “Effect>Amplify” from the Audacity menu.
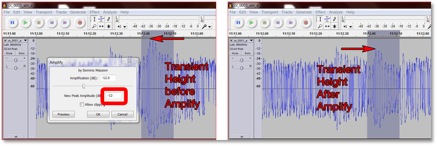
j. In the box beside “New peak amplitude” enter the decibel level recorded in Step 4f (In this example the value is -12)
k. Click “OK”
l. Repeat Step 4 until there are no more transient peaks, which are much louder than the surrounding audio.
Step 4. Normalize the audio (Amplify the audio signal as much as possible without clipping)
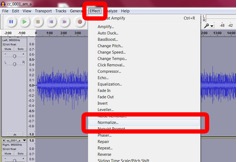
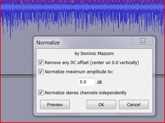
a. Choose effects “Normalize.
b. Select “Remove any DC offset”.
c. Select “normalize maximum amplitude to.” Enter 0.0 (zero) into the data entry box.
d. Select “Normalize stereo channels independently”.
e. Click “OK.”
NOTE: If the highest audio levels are already close to, or at, the maximum level (0 db) then there will be little or no amplification to the audio signal.
Step 5. Save the final Access Master
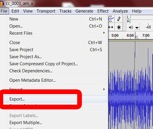
a. Click on “File>Export”.
b. Browse to “Access_master” folder.
c. Ensure filename is correct.
d. Select “Other uncompressed files”.
e. Click on the “Options” button.
f. Select “(WAV)Microsoft” and “24bit signed PCM.” Click “OK”.
g. Click “Save” to write save Access Master file. Note: this process will over-write the digitized audio file.
h. A metadata entry box will pop up. Enter appropriate metadata and click “OK”.
i. A window will pop with a warning that the filename already exists in that folder. Click “Yes” to overwrite the file.
Step 6. Apply appropriate metadata to the access master file
a. Double-click on the BWF MetaEdit icon to launch the application.
b. Press Ctrl+F to bring up the open file box. Browse to the current file and click “Open”.
Enter metadata and ensure that checksum has been created/embedded/tested.
c. Click on the “Save" button to save file the file as a broadcast wave with metadata and checksum embedded.
Step 7. Set file status to "Access Master Created"
Open tracking spreadsheet and type "create access copy" into the "next step" field for current media item.
Creating a MP3 Access Copy of Audio File using Audacity 2.0
1. Confirm that standard settings are as required
2. Open the access master version (.wav) of the audio file
3. Select File>Export
4. Choose a destination folder for the MP3 file
5. Select “Save a type” = MP3
6. Name the file in accordance with established criteria for the project
7. Open “Options” and confirm:
- Bit Rate Mode: Constant
- Quality: 256 Kbps
- Channel mode: Joint Stereo
8. Save file to destination folder
9. When “Edit Metadata” box appears
- Confirm that any information that appears (inherited from the access master or standard inputs from saved template) is correct
- Add any other information that is required (from media tracking spreadsheet or other relevant source)
10. Press “OK”
11. Change sample rate to 44100
12. After the file is created and completed you will be asked if you want to save the open file. Do not save the file unless you want to create an Audacity project.
