Documentation:Kaltura/My Media Quicksheet
My Media allows users to view, add, edit, delete and assign their own media to a specific course.
Faculty may also contribute media to the Faculty Repository from My Media.
Download the My Media Quicksheet
This document shows you:
- Best Practice
- How to access My Media page
- My Media view and functions
Effective Practices
- All media files must comply with Canadian Copyright Laws. For copyright guidelines, please visit Copyright at UBC.
- When uploading a video, assign video categories and add metadata to easily locate files later. For recommended guidelines on metadata, click here.
- Create a standard tag for your course and notify all course members about it.
- In regards to deleting a media file and ownership, please refer to Manage and Share Content (How To).
- (Instructor Only) To transfer ownership to another instructor please contact the UBC IT Help Desk.
Access My Media page (How to)
My Media can be accessed from the My Media module on the My Connect tab or from a Course Gallery.
My Media module on My Connect tab
My Media is a module that can be added to the My Connect tab.
Follow these steps to add the My Media module to the My Connect Tab:
- On the My Connect Tab, click Add Module button in the left hand corner.
- On the left side of the Add Module page, type in Media in the search field and click the Go button.
- My Media appears on the right side under My Media module. Click the Add button below the module to add the module to your My Connect tab.
Course Gallery
Enter the Course Gallery either from the Course Gallery Module or from a Tool Link on the course menu.
Once you have entered the Course Gallery, click the My Media link on the top of the page to enter into your My Media page.
My Media View and Functions
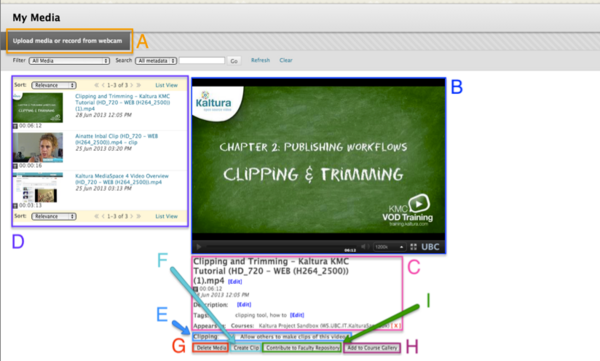
The available actions for users on this page include:
- Upload media file or record and upload from webcam (A).
- In section (B) you can: view video by clicking on the video player, select bitrate for video in playback mode at the bottom of the video player, and select captions options if there is a Captions file associated with the video by hovering your mouse at the top right corner of the video player for the Captions button.
- Edit metadata and video viewing options (C).
- Sort through gallery (D) of My Media files. Click the video links to view and edit video metadata, and control options such as embed codes and remove media (D).
- Allow other users to make clips (E) of your video.
- Clip video files using the clipping tool (F).
- Delete media (G).
- Add media file to Course Gallery with the Add to Course Gallery button (H).
| When students add media to the Course Gallery, they are hidden and need to be approved by the instructor. This is used to moderate student uploads. |
- (Faculty Members Only) Contribute media to the Faculty Repository (I).

The My Media page includes the following actions for users: upload media file or record and upload from webcam (A), view video and select video player options (B), edit metadata and video viewing options (C), sort through gallery (D) of My Media files (click on video links in the gallery to view video, video metadata and video options), allow other users to make clips (E) of a video, clip video files using the clipping tool (F), delete media (G), add media file to Course Gallery with the Add to Course Gallery button (H), and faculty members only can contribute media to the Faculty Repository (I).
Related Links
- Upload a Video (How to)
- Kaltura Video Building Block 4.0 for Blackboard 9 Quick Start Guide
- Course Gallery Quicksheet
- Create and upload video from webcam (How to)
- Create a Clip (How to)
- Manage Videos in My Media
- Contribute to the Faculty Repository (How to)
- Kaltura Overview Quicksheet
- Guidelines for Metadata
- Copyright at UBC

