Documentation:DentalhygEportfolioSession
Posts
Formatting Your Post using the Kitchen Sink
The Kitchen Sink (see Figure 3 image at right) drop-down toolbar provides you with a menu from which you can choose how to format your text.
- From the Dashboard, click Posts on the left-hand menu bar.
- Select a Post to edit by clicking on the underlined title. When the Post opens, click the Kitchen Sink icon. (see Figure 3 image at right)
- The Kitchen Sink toolbar enables you to bold fonts, increase font size, change the colour, make bulleted lists, inserts images, and hyperlinks, etc. When you have finished formatting your post click Publish and visit your site.
Embedding Media
Although videos cannot be uploaded to UBC Blogs they can be embedded (linked) from other sites. These might be videos that you create and have uploaded to second party sites or they might be videos that have been uploaded by another party, for example conference presentations.
- From the "Dashboard", click "Posts" on the left hand menu bar.
- Select a Post to edit by clicking on the underlined title. When the post opens place your cursor where you would like the video to appear and click on the HTML tab.
- Open a new tab in your browser and locate the video you wish to embed from sites like: YouTube, Blip.TV and Vimeo. Once you have located a video click on the video URL and copy it.
- Return to the post you have set up and click on the source of the video (YouTube, Blip.tv, Vimeo and paste the video URL into this form. Keep in mind copyright and privacy issues when using second party sites.
Adding Specific Users
The WordPress Users feature is designed to give the blog owner the ability to control and assign what users can and cannot do in the blog. A blog owner must manage and allow access to such functions as writing and editing Posts, creating Pages, defining Links, creating Categories, moderating Comments, managing Plugins, managing Themes, and managing other users. You can add as many administrators, subscribers, editors, authors, and contributors to your blog as your like.
- From the Dashboard, click the drop-down menu on Users and select Add User.(see Figure 10 image at right)
- Enter a Username and Email, select a Role from the drop-down menu, and click Add User.
- The user you have added will appear in the invitation box below.
Widgets and Headers
Customizing Headers
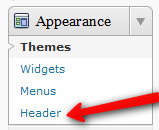
- From the Dashboard, under the Appearance drop-down menu, click Header. (see Figure 8 image at right)
- Click on Choose File, select an image (jpg, gif, png) from your computer and click Upload.
- Adjust the header image with the slide ruler and click Crop Header.
- Click Visit Site and see what your webspace looks like now!
Adding Widgets
A Sidebar “Widget” is just a silly word that WordPress has chosen to describe the sidebars on your webspace. Widgets are things you can add to your webspace to make it more interesting, such as a calendar, links to your favorite websites, a search feature, a tag cloud, and so much more!
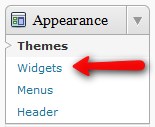
- From the Dashboard, under Appearance, click Widgets. (see Figure 11A image at right)
- Select the desired widget(s) and click on it.
- Drag the widget to the sidebar and drop it where you would like it to appear.
- Enter a Title, select a Position, and click Save Widget.
- Open each widget and edit the title and content and click Save.
- Click the Visit Site button at the top of your screen to see the new sidebar on your webspace.
Hands-on Activity: Adding and Editing Widgets
- From the Dashboard, under the Appearance drop- down menu, click Widgets.
- Remember to drag and drop them onto the Sidebar on the right hand side!
- Click Visit Site and see what your webspace looks like.
Editing your UBC Blogs Profile
In addition, to the WordPress blog system UBC has developed a front-end that allows for social interaction. Your UBC Blog profile determines you visibility in the overall UBC Blog community.
- From your "Dashboard", click on UBC Blogs in your header and this will open up your UBC Blogs profile. From this page you can see activity on the UBC Blog site and keep track of your own posts and comments.
- Click on your "Display Name" from just above the "Login" link, this will open your profile. Click on "Edit" profile to change your display name.
- Click on "Change Avatar" to change your avatar for UBC Blogs
- Click on privacy to alter your activity streams and the visibility of your profile. Because you have set your site to be viewed by subscribers only new posts will be hidden from the UBC community.
Creating Another Blog
You have the option of creating a second (even third!) webspace for yourself/department/faculty.
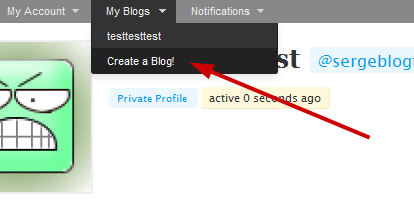
- From the My Blogs drop down menu at the top of the screen, click Create a Blog.
- The "Get another UBC Blogs site in seconds"" appears. Complete the required fields and click the Create Site button at the bottom of the page.


